Contracts & HR letters
Your workspace keeps two related sets of official documents:
- Contracts — the employment agreement for each person: type, dates, salary, and terms.
- HR letters — the letters HR issues to employees (experience certificates, salary certificates, warning letters, and so on).
Both can be issued as branded PDFs, and both carry a QR verification code so an outside party — a bank, an embassy, a future employer — can confirm the document is genuine.
Contracts
Open Contracts from the admin sidebar (/admin/contracts) to see every contract in your workspace with its employee, type, dates, and status.
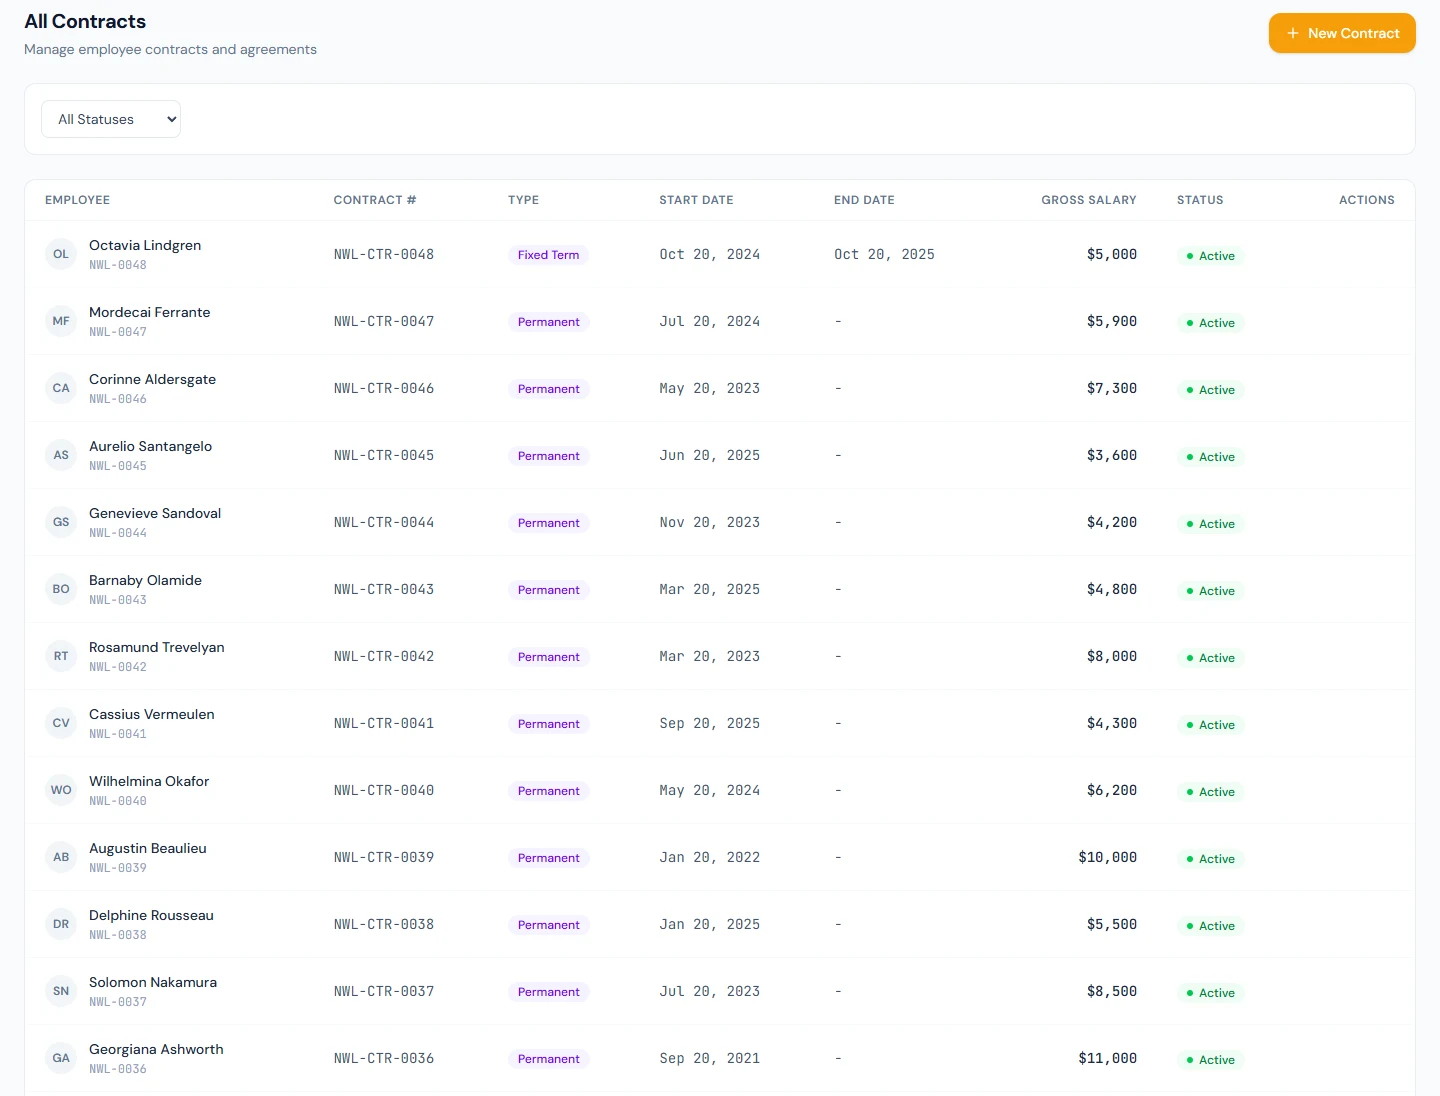
Contract types
| Type | Meaning |
|---|---|
| Permanent | Open-ended employment, usually no end date |
| Fixed term | Runs between a start and end date |
| Probationary | Trial period, often with a probation length in months |
| Consultant | Contractor / consultant engagement |
Contract statuses
A contract moves through these states:
- Draft — created but not yet in force. You can still edit everything.
- Active — the live agreement for that employee.
- Renewed — replaced by a newer contract created through the renew action.
- Terminated — ended early by HR.
- Expired — its end date has passed.
Create a contract
A contract can only be created for an employee who already has a salary structure assigned. The contract states the same gross salary payroll will pay, so the figure comes from the salary assignment rather than being retyped. The server refuses to create a contract without one (the error points you at Payroll → Employee Salaries), and the form shows an amber notice with an Assign a salary structure button (linking /admin/payroll/salaries) and keeps the submit disabled while the picked employee has none.
- Go to Contracts and choose Create contract (
/admin/contracts/create). - Pick the employee. The picker is not limited to active employees — it includes New (Pending Activation) hires, since a new hire is the most common subject of a contract and accepting it is what activates them. Employees who have left (terminated, resigned, retired, or separated) are still excluded.
- Once you pick an employee, the form pre-fills the start date (from their joining date), the gross salary and linked salary structure (from their current salary assignment), and the probation months (derived from their recorded probation end date). Only empty fields are filled — anything you already typed is kept.
- Choose the contract type and set the end date for fixed-term or probationary contracts.
- Review the pay. The gross salary is pre-filled from the salary assignment and the assigned figure is shown under the field; you can override the number, but the form flags the mismatch inline: Changed — this contract will state a different figure from payroll.
- Add the terms and conditions text, or leave it to be filled from a template.
- If the employee owns inventions, works or know-how from before joining that they keep, list them under Pre-existing intellectual property, one item per line. Leave it empty if there is none (see below).
- Save. If you leave the contract number blank, the system generates one for you.
New contracts start in Draft. When the terms are final, open the contract and choose Activate to make it the employee's live agreement.
/admin/contracts/create?employeeId=<id> opens the form with the employee preselected. This is where the activation checklist on the employee profile and the onboarding "Create employment contract" task land.
Creating and renewing contracts needs the Contracts: create permission; editing, activating, terminating, and renewing need Contracts: update. See /docs/workspace/roles-and-permissions. Drafting a contract needs only Contracts: create — the salary prefill is served to contract creators without requiring payroll's salary-view permission.
Pre-existing intellectual property
The standard employment agreement includes a schedule of pre-existing intellectual property: what the employee created before joining and keeps as their own. The agreement treats anything not listed there as company property, so record the declaration before the employee signs.
- The schedule prints the Pre-existing intellectual property field of the contract, each line on its own line. When the field is empty it prints None disclosed.
- You can fill it in on the create form, or later from the contract's detail page: Edit next to Pre-existing intellectual property. It can be changed until the contract is accepted in the portal or a signed copy is uploaded, and not on a terminated or renewed contract.
- Renewing a contract carries the declaration over to the new contract.
- In a custom contract template, the declaration is the
{{preExistingIP}}variable. Use{{#if preExistingIP}}…{{else}}…{{/if}}to print your own wording when nothing was declared.
Templates
Contract templates hold your standard terms so you don't retype them for every hire. Manage them under Contracts → Templates (/admin/contracts/templates). You can create, edit, delete, and preview a template's rendered output before using it.
Signing a contract
There are two ways a contract gets signed:
- Electronic acceptance — the employee opens My contract in their portal (
/portal/contract), reviews the agreement, and accepts it. The system records the acceptance along with the employee's IP address and browser for the record. - Physical copy — HR prints, signs, and scans the agreement, then opens the contract and uses Upload signed copy to attach the scan and record the signed date.
Signing does more than complete the paperwork. For an employee still in New (Pending Activation), either signature path activates them automatically — their status flips to Active and their pro-rata leave for the current fiscal year is allocated. The Upload signed copy path matters especially for employees created without a portal login, who cannot e-accept: recording the signed paper copy is their only activation route.
Activation is idempotent and one-directional. It only ever moves a New employee to Active — it never revives someone terminated, resigned, or retired, and re-signing does nothing for an already-active employee. See Employees for the full picture of statuses and activation.
You can also record witnesses for the printable copy, and if an acceptance was made in error, an admin can revoke acceptance with a reason.
Download the PDF
From a contract's detail page you can download it as a PDF. Three variants are available:
- Plain — the agreement text only.
- Default — the standard rendered agreement.
- Stamp overlay — a version prepared to carry the company stamp/seal.
Employees can download their own agreement from the portal.
Renew a contract
Only active or expired contracts can be renewed.
- Open the contract and choose Renew.
- Enter the new end date — it must be later than the current end date (or the start date if there isn't one).
- Optionally set a new salary and a reason for the renewal.
Renewing does three things automatically:
- Records a renewal history entry (old end date, new end date, salary, reason).
- Marks the current contract as Renewed.
- Creates a fresh Active contract that begins where the old one ended, carrying over the type, salary structure, terms, and pre-existing intellectual property declaration.
Expiring contracts
Open Contracts → Expiring (/admin/contracts/expiring) to see contracts approaching their end date so you can renew or terminate them in time. The window defaults to the next 30 days; you can widen or narrow it.
HR letters
Open HR letters from the admin sidebar (/admin/hr-letters) to see every letter your workspace has issued.
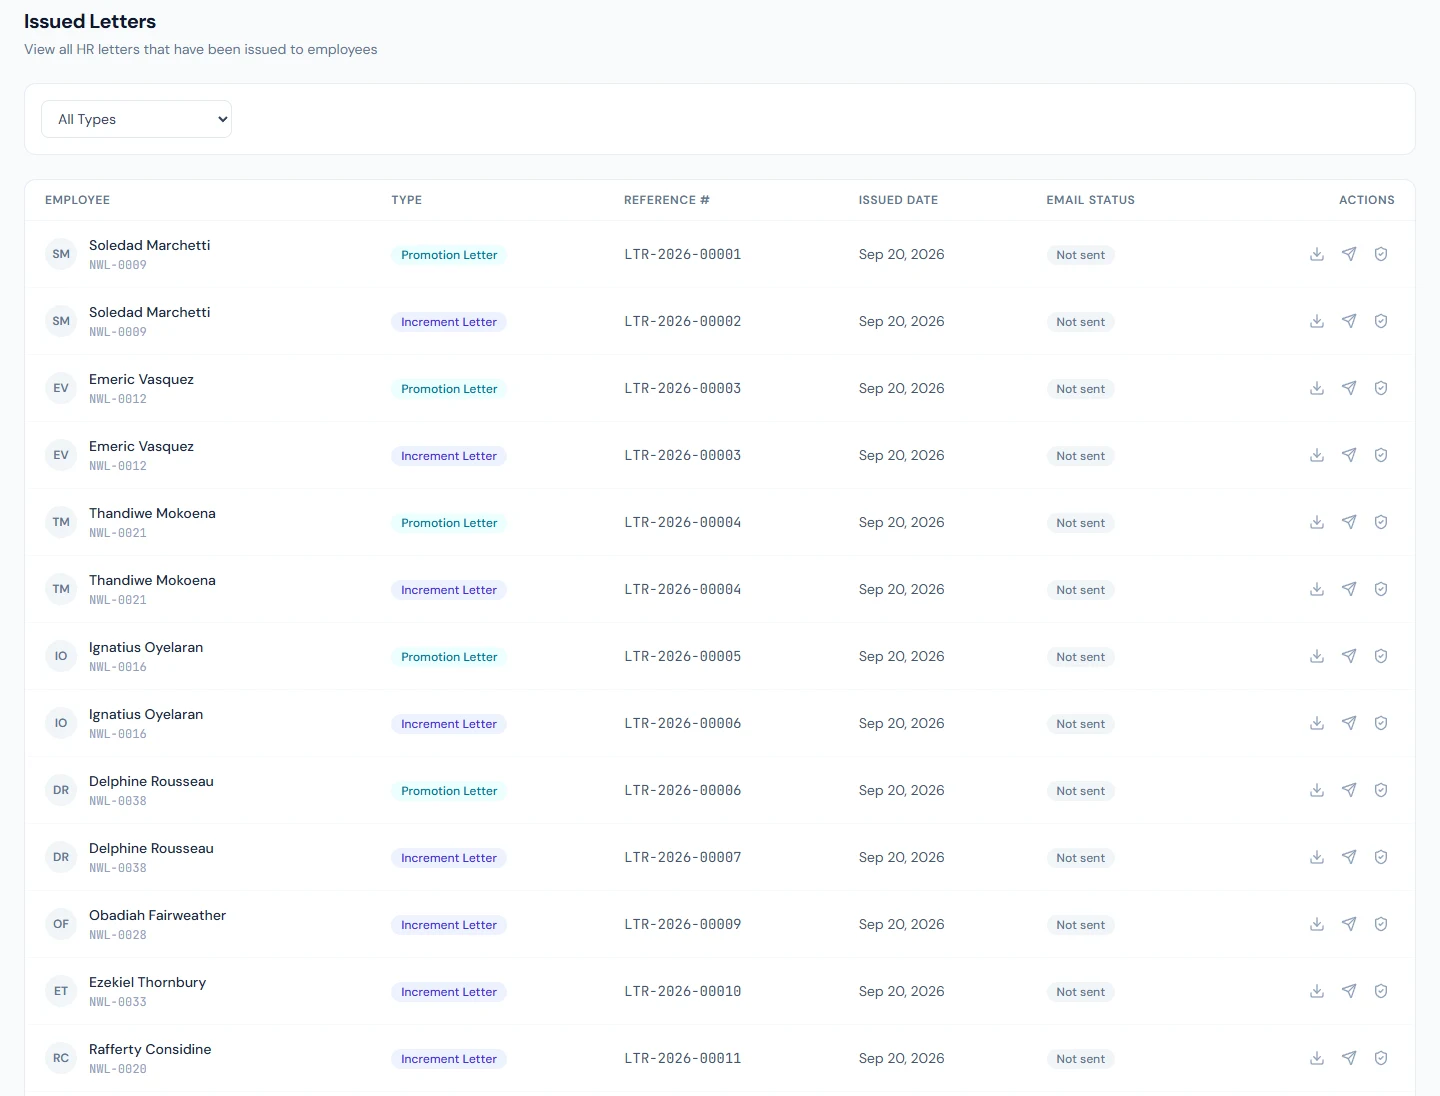
Letter types
You can issue these letter types:
| Letter type | Typical use |
|---|---|
| Offer letter | Job offer before joining |
| Appointment letter | Confirms the appointment on joining |
| Confirmation letter | Confirms an employee after probation |
| Experience certificate | Proof of prior employment |
| Salary certificate | States current salary, e.g. for a bank |
| Increment letter | Records a pay increase |
| Promotion letter | Records a promotion |
| Transfer letter | Records a move between locations/departments |
| Warning letter | Formal disciplinary warning |
| Termination letter | Ends employment |
| Custom | Any other letter you design |
A confirmation letter is normally generated automatically when you confirm an employee at the end of probation (see Onboarding & offboarding), but you can also issue one manually from the Issue screen like any other type. The manual form asks for the same details the automatic path fills in — designation, department, joining date, and confirmation date — so a re-issue or correction matches the auto-issued original.
Letter templates
Manage the wording under HR letters → Templates (/admin/hr-letters/templates). Each template has a name, a type from the list above, and body content. Templates use placeholder tokens that get filled in with the employee's data and the values you enter when issuing. You can preview a template — saved or unsaved — before using it. Deactivating a template hides it from the issue screen without deleting past letters.
Issue a letter
- Go to HR letters → Issue (
/admin/hr-letters/issue). - Choose the employee, the letter type and the template. Each standard design is listed once per language (for example "Standard Salary Certificate · EN"); the template's language decides the letter's wording and date format. For an Experience Certificate the employee search also finds people who have left.
- Fill in the letter's fields — these are the values that replace the template placeholders. For salary and increment letters, the current salary can be pulled in to prefill.
- Set the issued date and issue the letter.
Every issued letter gets a reference number automatically and a QR verification code embedded in its PDF (see Document verification below).
From the issued-letters list you can open any letter and email it to the employee as a PDF attachment.
Issuing letters and managing templates needs the HR letters: manage permission.
Letter requests from employees
Employees can ask HR for certain letters themselves, instead of emailing a request.
From their portal Letters page (/portal/letters), an employee can request one of:
- Experience certificate
- Salary certificate
- Appointment letter
- Offer letter
Administrative letters — warnings, terminations, transfers, promotions, increments, and custom letters — can never be self-requested; those always originate from HR.
When requesting, the employee gives a purpose and can add who it's addressed to and any notes. On experience and salary certificates, the addressee replaces "To Whom It May Concern". An employee can cancel a request while it is still pending.
Handling requests as HR: open HR letters → Requests (/admin/hr-letters/requests). A request moves through:
- Pending — waiting on HR.
- Issued — fulfilled; issuing a letter against the request links the two and automatically emails the employee.
- Rejected — declined with a reason.
- Cancelled — withdrawn by the employee.
To fulfil a request, issue the matching letter and link it to the request; the request flips to Issued on its own. To decline, use Reject and provide a reason.
Reviewing and rejecting requests needs the HR letters: manage requests permission. Employees need HR letters: request to raise one and HR letters: view own to see their issued letters.
Document verification (QR codes)
Every issued HR letter — and salary slips and tax certificates — carries a QR code and a short verification code printed on the PDF. This lets anyone holding a copy confirm it is genuine and see the official version, without logging in.
How a verifier checks a document
-
They scan the QR code or open the printed link, which takes them to your workspace's public verify page:
https://<your-workspace-domain>/verify/<code> -
The public page shows whether the document is valid or revoked, along with the document type, the employee, the issuing company, and the relevant dates.
-
They can download the official copy of the PDF straight from that page to compare against the copy they were handed.
The verify page is public and requires no account. It only ever shows that single document's summary and the official PDF — nothing about other employees or other documents. Lookups are rate-limited to protect against someone guessing codes.
The QR code is only embedded if your workspace has a public app URL or verified custom domain configured, so that the printed link is one an outsider can actually reach. See /docs/workspace/custom-domain.
Revoking a document
If a letter was issued in error or is no longer valid, open it and use the Revoke action (a reason is required). After that:
- The public verify page marks the document revoked and shows the reason.
- The official PDF can no longer be downloaded from the verify page.
Revocation can be reversed with Unrevoke if it was a mistake. Revoking or restoring a document requires the manage permission for that document type — for letters, that's HR letters: manage.
Related pages
- /docs/workspace/employees — employee records that contracts and letters draw from
- /docs/workspace/payroll — salary structures linked to contracts
- /docs/workspace/roles-and-permissions — who can create, issue, and revoke