Company setup
Company setup is where you describe your organization to Operentra and lay the
foundations the rest of the workspace builds on. Everything here lives under the
Company Setup group in the admin sidebar, at routes beginning with /admin/company.
Most of these screens are things you fill in once and revisit occasionally. The data flows everywhere: your logo and address appear on payslips and letters, departments and designations organize your people, and bank accounts drive salary disbursement.
Your admin dashboard shows a Getting started checklist that tracks the key setup steps — company profile, departments, designations, a salary structure, a bank account, your first employees, leave groups, public holidays, how attendance is captured (when your plan includes a biometric machine or GPS attendance), and your first payroll — and marks each one done as you complete it. You can dismiss it once you no longer need it. See Getting started for every step.
Company profile
Open Company Setup → Company Profile (/admin/company/profile). The form is
split into four sections.
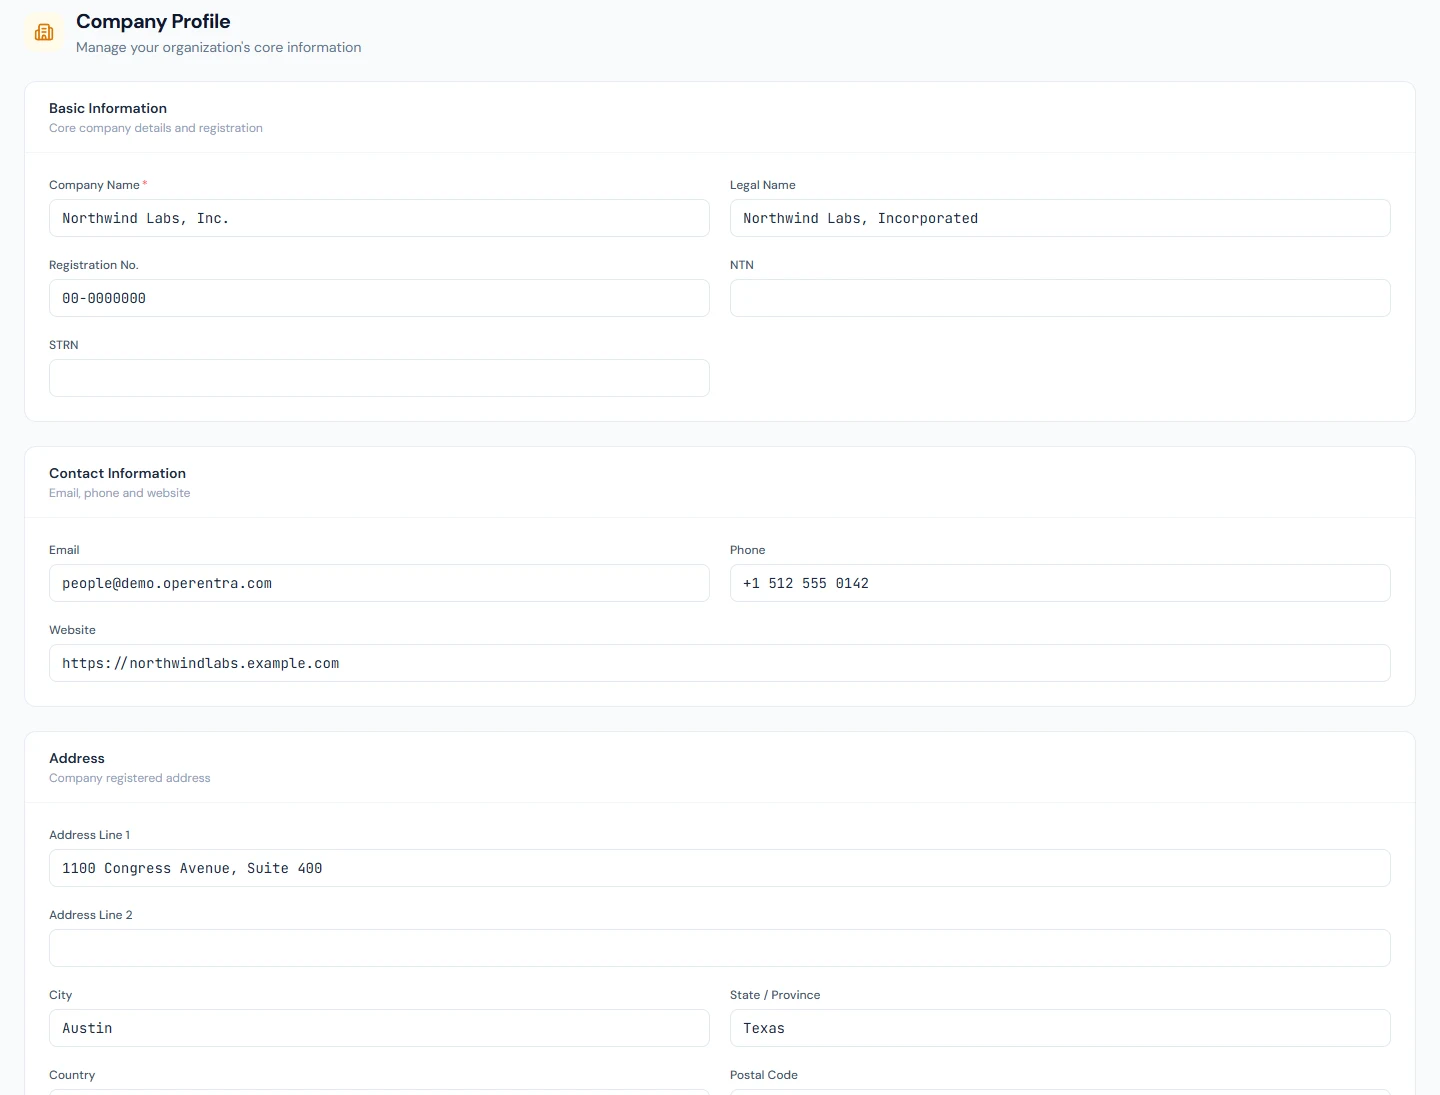
Basic information
| Field | Notes |
|---|---|
| Company Name | Required. The name shown across the app. |
| Legal Name | Your registered legal entity name, if different. |
| Registration No. | Company registration / incorporation number. |
| NTN | National Tax Number. Shown in Pakistani workspaces only, or once a value is on file. |
| STRN | Sales Tax Registration Number. Shown in Pakistani workspaces only, or once a value is on file. |
Contact information
Email, Phone, and Website for the organization.
Address
Address Line 1 and 2, City, State / Province, Country, and Postal Code.
Country is set when your workspace signs up and cannot be changed here. It drives your tax and gratuity rules, public-holiday sync, the national bank list, the fiscal year start, and document formatting. If it was entered incorrectly, contact support — changing it after the fact would corrupt existing records.
Regional settings
| Field | Notes |
|---|---|
| Currency | Read-only — set at signup. It labels every payslip, certificate, and document. Contact support to correct it. |
| Date Format | Choose how dates display: DD/MM/YYYY, MM/DD/YYYY, YYYY-MM-DD, or DD-MMM-YYYY. |
| Timezone | The timezone your workspace operates in. |
Changing the timezone re-anchors time-based automations (such as the auto-present attendance job and birthday wishes) to the new zone, so they fire at the right local time.
The workspace's default email language and document language are set under
Workspace Settings → Language (/admin/settings/workspace), not on the company
profile — profile is identity, language is behavior. See
Languages & localization for what each
setting controls.
Click Save Changes to apply.
Branding
Branding lives on its own screen at Settings → Branding
(/admin/settings/branding). Upload a PNG, JPG or GIF for each asset; a live
preview appears once uploaded.
| Asset | Where it appears | Recommended |
|---|---|---|
| Application Name | Sidebar, browser tab, and login page. Falls back to your company name if left empty. | Short text |
| App Logo | Sidebar, login page, and browser. | 200×50px or wider, PNG with a transparent background |
| Favicon | The small icon in the browser tab. | 32×32px or 64×64px, PNG |
| Company Logo | All printable material — salary slips, HR letters, tax certificates, contracts, and email headers. | 400×400px or wider, PNG or JPG |
| Company Seal / Stamp | Salary slips, HR letters, and other official documents, as a digital stamp. | PNG with a transparent background |
Departments
Open Company Setup → Departments (/admin/company/departments) and click
Add Department.
| Field | Notes |
|---|---|
| Department Name | Required. |
| Code | Required. A short identifier (e.g. HR). |
| Parent Department | Optional. Leave as None (top-level) or nest it under another department to build a hierarchy. |
| Cost Center | Optional accounting reference (e.g. CC-001). |
The table shows each department's employee count. A department that still has active employees cannot be deleted — reassign its people first.
Designations
Designations are your job titles. Open Company Setup → Designations
(/admin/company/designations) and click Add Designation.
| Field | Notes |
|---|---|
| Designation Name | Required (e.g. Senior Software Engineer). |
| Code | Optional short code. |
| Level | Optional number used to order roles by seniority. |
| Pay Grade | Optional link to a pay grade (see below). |
| Job Description | Optional. Appears in the Employment Agreement for every employee assigned to this designation. |
| Exempt from daily reports | Toggle. Employees in this role (e.g. driver, security guard) won't be asked for daily reports or penalised for missing them. Can be overridden per employee. |
Every workspace starts with 51 designations, from office support to CEO, each with a job description you can edit. The entry-level office support role is Office Assistant. It is Office Boy only where the live-in residential employment types are added too (see Employment types). Job descriptions that touch tax, payroll or labor law use neutral wording; Pakistan workspaces get the names of their own authorities and statutes.
Pay grades
Pay grades are salary bands. Open Company Setup → Pay Grades
(/admin/company/pay-grades) and click Add Pay Grade.
| Field | Notes |
|---|---|
| Name | Required (e.g. PG-1). |
| Min Salary | Required. Bottom of the band. |
| Max Salary | Required. Top of the band. |
Amounts are in your workspace currency. Once defined, a pay grade can be attached to a designation to document the expected salary range for that role.
Fiscal years
Open Company Setup → Fiscal Years (/admin/company/fiscal-years) and click
Add Fiscal Year.
| Field | Notes |
|---|---|
| Name | Required (e.g. FY 2025-26). |
| Start Date | Required. |
| End Date | Required — must be after the start date. |
| Set as current fiscal year | Marks this as the active period. Only one fiscal year can be current at a time. |
Fiscal years cannot overlap each other. Setting a new one as current automatically clears the flag on the previous one.
Rollover is automatic
You rarely need to open the next fiscal year by hand. A daily platform job creates it automatically just after midnight, in your workspace's time zone, on the day after your current year ends: the new window starts the day after the previous end date and runs one year minus a day, so whatever calendar you use — July–June, April–April, or a custom window — is preserved exactly. The new year is marked current, and leave allocation for it — including carry-forward from the year that just closed — runs straight after.
If you already created the next year yourself, the job adopts it instead of creating a duplicate.
There are two cases where the job deliberately stops and leaves the fix to you on this page:
- Your fiscal years have a gap around today's date — it will not invent a partial bridging year to close the hole.
- Your newest fiscal year is more than 15 years in the past — it will not mass-create that many years at once.
Keep manual Add Fiscal Year for those repairs and for historical backfill.
In a country with progressive income tax, a freshly rolled fiscal year needs that year's tax slabs before you run payroll. See the note on the Payroll page about checking Tax → Tax Slabs at the start of each fiscal year.
Public holidays
Holidays have their own section in the sidebar, separate from Leave. Holidays →
Holiday Calendar (/admin/holidays) lists the year's holidays grouped by month, each
with its date, type and the branches it applies to. The year arrows move between
years.
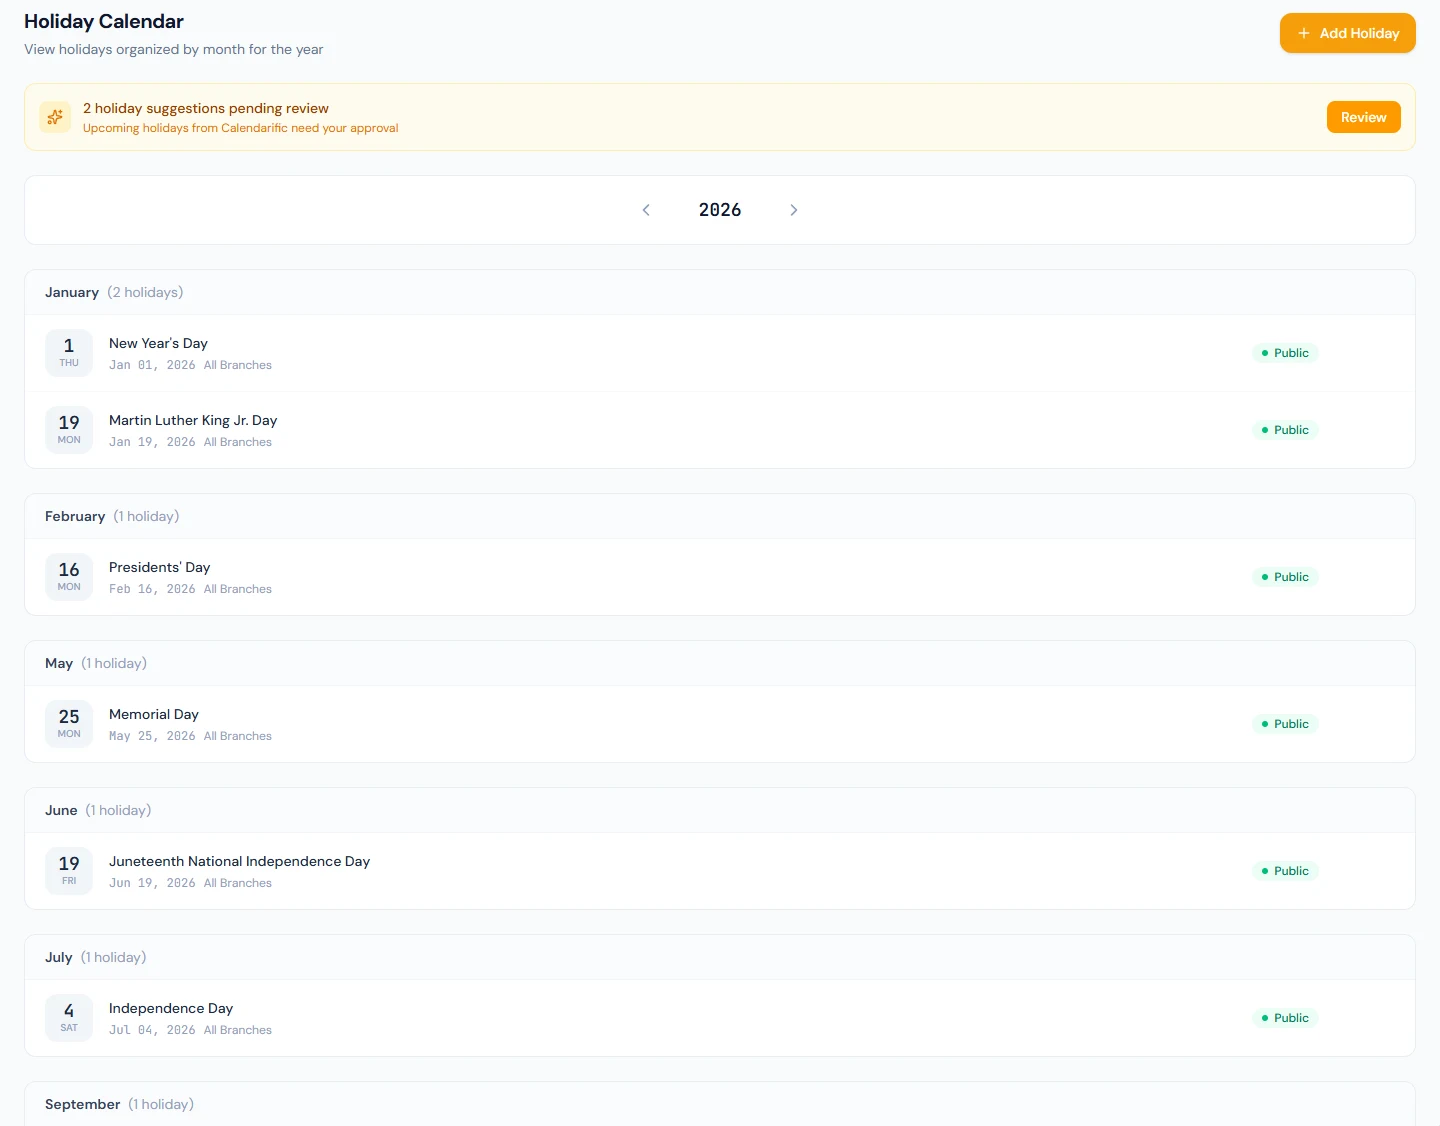
A holiday can be marked for all branches or for one branch. Today the branch is a label on the calendar: attendance, leave and payroll treat every holiday as company-wide. A holiday marked Recurring every year is copied into the following year by the weekly holiday job (Mondays shortly after 09:00, workspace time), on the same month and day.
The other three pages in the section need the holidays.manage permission:
| Page | Path | What it is for |
|---|---|---|
| Manage Holidays | /admin/holidays/manage | Add, edit and remove entries by hand. |
| Import Holidays | /admin/holidays/import | Upload a CSV of holidays (name, date, type, recurring, branch); every row is checked before anything is written. |
| Holiday Suggestions | /admin/holidays/suggestions | Sync the country's public holidays from the feed and review them before they count. |
Synced holidays arrive as suggestions rather than being added silently, and a banner on the calendar links to the queue. Nothing from the feed affects attendance or payroll until someone approves it.
Employment types
Employment types categorize how someone is engaged. Open Company Setup →
Employment Types (/admin/company/employment-types) and click Add Type.
| Field | Notes |
|---|---|
| Name | Required (e.g. Permanent, Contract, Intern). |
| Description | Optional. |
| Residential / on-site | Toggle for live-in roles (for example a guard or driver) who stay on company premises. |
| Accommodation provided | Toggle. |
| Meals provided | Toggle. |
Every workspace starts with Permanent, Probation, Contract and Intern. The live-in residential roles (office boy, guard, driver) are added automatically only where your country's leave set has groups for them; add them yourself anywhere else.
Branches
Branches are your office locations. Open Company Setup → Branches
(/admin/company/branches) and click Add Branch.
| Field | Notes |
|---|---|
| Branch Name | Required. |
| Code | Required (e.g. LHR-01). |
| City / Phone / Email / Address | Optional contact details. |
| Google Maps URL | Optional. Paste a share link from Google Maps — it becomes a "View on map" link on interview confirmation pages and emails. |
| Head Office | Toggle. Only one branch can be the head office; setting a new one clears the previous. |
Bank accounts
These are your company's bank accounts, used to disburse salaries and generate the
bank payment file. Open Company Setup → Bank Accounts
(/admin/company/bank-accounts) and click Add Account.
| Field | Notes |
|---|---|
| Bank | Required. Choose from your workspace's bank list (see Banks below). |
| Branch Name | Optional. |
| Account Title | Required. |
| Account Number | Required. Must be unique within your workspace. |
| IBAN | Optional (e.g. PK00BANK0000000000000000). |
| SWIFT Code | Optional — pre-filled from the selected bank when available. |
| Primary account | The account used for payroll. Only one can be primary. |
| Purpose | Operating pays salaries. Fund account receives a contribution fund — for example your provident fund's account. A fund account is never offered as the account salaries are paid from. |
Use the pencil icon on a row to edit an account, for example to mark an existing account as a fund account.
Each account row has a Design link that opens the payment-file designer, where you can tailor the bank file format for that account.
Banks
The Banks screen (/admin/company/banks) is the list of banks your employees and
payment files can reference.
- Catalog banks are the shared national list for your country. They're locked and can't be edited here — if a national routing code is wrong, contact your platform operator.
- Banks you add are private to your workspace. Use Add bank for any local bank that isn't in the catalog.
When adding a bank you can record its Bank name, Short name (the label used on payment files), IMD / routing code, SWIFT / BIC, and IBAN prefix. Banks added by your workspace can be edited or removed later; catalog banks cannot.
Related settings on their own pages
A couple of workspace settings that are closely related to company setup live elsewhere:
- Email sender identity — the "from" name and reply-to address your workspace sends
email as — is configured under Settings → Workspace (
/admin/settings/workspace). - Custom domain — serving your workspace on a domain you own — is on the same Workspace settings screen.