Users, roles & permissions
Access Control decides who can sign in to your workspace and what they can do once they are in. It lives under the Access Control section of the admin menu and has three screens:
| Screen | Where | What it's for |
|---|---|---|
| Users | /admin/access/users | The people who can log in — their credentials, roles, and status |
| Roles | /admin/access/roles | Named bundles of permissions (e.g. HR Manager) |
| Permissions | /admin/access/permissions | A read-only catalog of every permission, grouped by module |
Only users with the Manage Users permission see the Users screen, and only users with the Manage Roles permission see Roles and Permissions.
A user gets the union of the permissions from all the roles assigned to them. Assigning two roles adds their permissions together — it never subtracts.
Managing users
Open Access Control → Users. Each row shows the person's name and email, their linked employee (if any), their role chips, an Active/Inactive status pill, and when they last signed in.
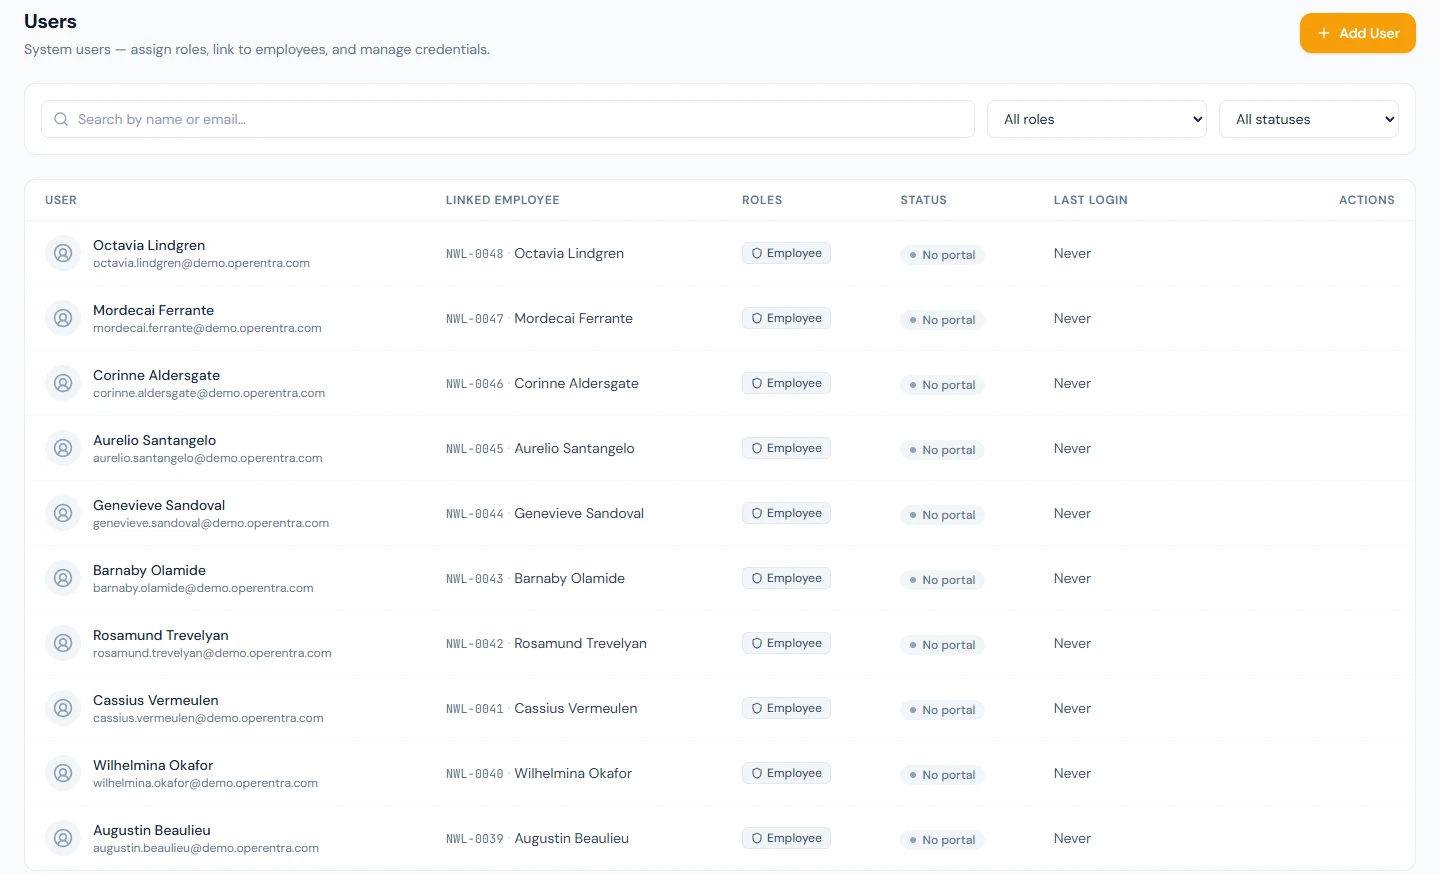
Use the search box to find someone by name or email, and the two dropdowns to filter by role or by active status.
A user row is a person's membership in your workspace. The sign-in email and password live on the person's platform-wide account, which can hold memberships in several companies — so the same sign-in can be an admin here and a regular employee in a sister company. This is why some actions below (reset password, email edits) reach beyond your workspace.
Invited accounts
Employees created with an email address get an invitation instead of admin-set credentials (see Employees). Until the person activates, their row shows an Invited badge — or Invite expired once the 7-day link lapses — and a Resend invitation action that regenerates the link and emails it again.
No-portal memberships
Employees created with No portal login (see Employees → Portal access) appear here with a No portal badge: the membership exists — it carries the employee link and counts toward your plan seat — but has no credentials, so the person cannot sign in. Two actions apply to such rows:
- Invite to portal (envelope icon) — enter an email address and a standard activation invitation is sent; when the person claims it, the membership becomes a normal login.
- Sign in as user — admins holding the impersonation permission can still open the portal as the person (audited as usual) when something needs checking from the employee's side.
Adding a user
Most employee logins are created by the invitation flow, but you can add a user directly — for example an accountant or auditor who needs access without an employee record:
- Click Add User.
- Enter a Name and Email. The email must be unique within your workspace.
- Choose the Portal access mode (see below).
- Optionally link the account to an employee — start typing an employee code or name and pick from the list. An employee can be linked to only one user account.
- Pick one or more Roles by clicking the role chips.
- Leave Active ticked, then click Create user.
There is no password field, and that is deliberate. You never set someone else's credentials. Membership is an offer the person accepts for themselves.
| Portal access | What happens |
|---|---|
| Invite to workspace (default) | An invitation is emailed. Nothing is created on their account until they accept. |
| No portal login | Admin-managed — no credentials and no sign-in at all. Use it for people who should appear in the workspace but never log in. You can invite them later from their row. |
If the address already has an Operentra account (say, from a sister company), they simply sign in as usual and the invitation is waiting for them as a banner at the top of the page, with Accept and Decline. Their existing password does not change. If the address is new to the platform, they choose their own password when they open the invitation link.
Either way, until they accept they are not a member, and your workspace holds nothing of theirs.
If the invitation is attached to an employee record and the person declines, only the login is refused — their employment, payroll and attendance are untouched. The row falls back to No portal login and shows a Declined badge, and you can invite them again at any time.
Editing, resetting & re-inviting
Hover a row to reveal its action buttons:
- Edit (pencil) — change the name, email, roles, and active status. The password and the linked employee are set only when the account is first created. Changing the email is blocked for people who hold memberships in more than one company — the address is their platform-wide sign-in email, so it's theirs to change (from My Account), not yours. The edit modal also offers Allow sign-in email change — a per-member exception that overrides your workspace's official email only sign-in policy for this one person, so they can move their sign-in to another address while still employed. It has no effect when your policy is Flexible.
- Reset password (key) — set a new password for the user. Because the password lives on the person's account, this re-keys their sign-in for every company they belong to and signs them out everywhere; they must change it at their next login. It also lifts a lockout, so someone locked out after too many wrong passwords can sign in with the new one straight away.
- Resend invitation — for invited accounts that haven't been claimed yet (see above); regenerates the activation link.
- Resend setup email (envelope) — appears only while an admin-created user still hasn't completed their first-time setup. It re-sends the one-click account-setup link so they can choose their own password (useful when the original link expired).
- Status pill — click the green/grey Active pill to activate or deactivate the account. A deactivated user keeps all their history but can no longer log in.
Signing in as another user (impersonation)
If you hold the Sign in as another user permission, a log-in icon appears on each row. It lets you open the app as that user to reproduce an issue or check what they can see.
- You can't impersonate yourself or a deactivated account.
- Every action you take is recorded under that user's account, and the event is written to the login audit trail.
- The session is pinned to your company. If the person also belongs to other companies, the company switcher shows only the workspace you impersonated them in, and switching is refused — impersonation never opens their other workspaces. The pin survives token refresh.
- Use the banner at the top of the screen to return to your own session.
- Impersonation deliberately does not prompt for the target's two-factor code — the permission and audit trail are the control here, not the target's authenticator.
Resetting a member's two-factor authentication
Members with 2FA enabled show a green shield next to their status. If you hold the
Reset a Member's Two-Factor Authentication permission (users.manage_2fa, Super
Admin only by default), a shield-off icon appears on those rows for when someone has
lost both their authenticator and their recovery codes. The reset clears the whole
enrollment — the member signs in with just their password and can re-enroll — and
because 2FA protects the account, it also removes the protection from their memberships
in other workspaces. The member is notified by email and the event is audited. See
Two-factor authentication for the full picture.
Deleting a user
The trash icon permanently removes an account, but the system deliberately makes this hard:
- You can't delete your own account.
- Deletion is refused if the user has any audit-trail activity (past logins, announcements they authored, interview feedback they gave, API keys they created, saved reports, and so on). In that case, deactivate the account instead to keep the history intact.
The workspace always keeps at least one active Super Admin. The system refuses to delete, deactivate, or strip the Super Admin role from the last active Super Admin — assign the role to another active user first.
The default system roles
Every workspace is created with six system roles. They are marked with a System badge, are locked (view-only), and cannot be edited or deleted — this guarantees you always have a sane baseline. To customise one, duplicate it (see below) and edit the copy.
| Role | Intended for |
|---|---|
| Super Admin | Full access — company configuration, every module, every operation |
| HR Manager | Employee management, attendance, leave, and payroll processing |
| HR Officer | Day-to-day HR operations with limited payroll access |
| Accountant | Payroll processing, salary disbursement, tax, cheques, and loans |
| Department Head | Team attendance, leave approval, and team reports |
| Employee | Self-service: own profile, attendance, leave, and salary slips |
The Employee role is the self-service baseline for staff who only use the employee portal.
Roles: creating and organising
On Access Control → Roles, each role is shown as a card with its display name, its slug, a short description, and counts of how many permissions it grants and how many users hold it.
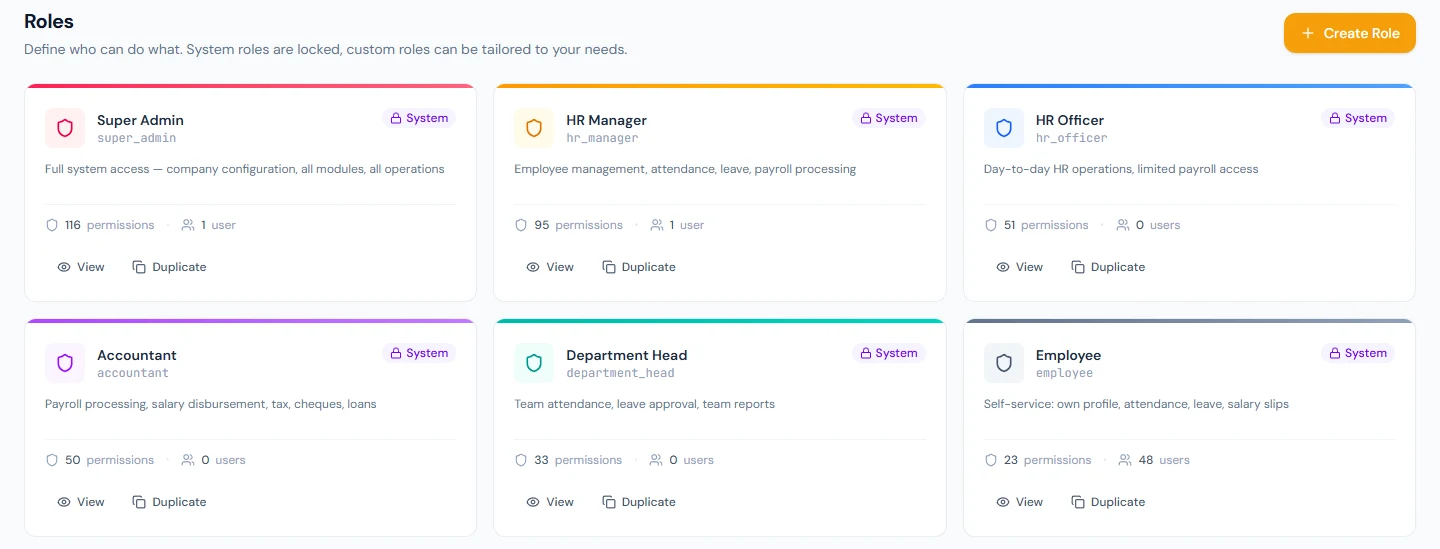
Create a role
- Click Create Role.
- Enter a Display Name (what people see, e.g. "Recruiter"). A lowercase Slug is filled in automatically — you can adjust it, but it must be unique within your workspace.
- Add an optional Description.
- Click Create & Configure — you land straight in the permission editor for the new role.
Duplicate a role
Click Duplicate on any role (including a locked system role) to create a new, editable copy that starts with the same permissions. This is the recommended way to build on a system role.
Delete a role
The Delete button appears only for custom roles that have no users assigned. System roles can never be deleted, and a role still assigned to people must have those users reassigned first.
The module-scoped role editor
Opening a custom role (Edit) or a system role (View) takes you to the permission editor:
/admin/access/roles/{roleId}/permissions
The screen is split in two:
- Left — modules. A searchable list of every module (Employees, Attendance, Payroll, Leave,
and so on). Each module shows a
selected/totalcount and an indicator that is filled when all of its permissions are on, half-filled when some are on, and empty when none are. - Right — permissions. The permissions inside the module you've selected. Each is a checkbox with its display name, its underlying code name, and a description.
Toggling permissions
- Tick or untick any individual permission checkbox.
- Use Select all in module / Deselect all in module at the top of the right pane to flip a whole module at once.
- Use Select all / Clear all at the bottom of the module list to flip every module.
For custom roles you can also edit the display name and description inline at the top.
An Unsaved badge appears as soon as you change anything, and the browser warns you if you try to leave with unsaved edits. Click Save changes to apply, or Reset to discard back to the last saved state. A summary bar at the bottom shows how many permissions are selected across how many modules.
System roles open in view-only mode — every checkbox is disabled and there is no Save button. Duplicate the role to get an editable version.
The Permissions catalog
Access Control → Permissions is a read-only reference of every permission the platform defines, grouped by module and searchable by name, action, or module. Permissions themselves are defined by the platform (Operentra) — you can't add or remove permissions here, only choose which roles grant them.
When new features add new permissions
As the platform adds modules, it also adds new permissions to the catalog. Two things are worth knowing:
- New permissions aren't automatically switched on for your custom roles. After a new module appears, open the roles that should use it and tick the new permissions in the editor. (The built-in system roles receive sensible defaults from the platform.)
- Affected users must sign out and back in. A user's available menus and buttons are loaded from their permissions when they log in. After you change a user's roles — or change the permissions inside a role they hold — ask them to log out and log back in so the new access takes effect throughout their interface.
If someone reports that a new screen or button "isn't showing up" even though you granted the permission, the fix is almost always a fresh log out and log in.