Attendance
The Attendance area lets you see who was present each day, correct records, define working shifts, review employee requests, and pull punches from biometric devices. Everything below lives under Attendance and Biometric in the admin sidebar.
| Screen | Route | What it's for |
|---|---|---|
| Daily Attendance | /admin/attendance | View attendance by date or by employee/month |
| Mark Attendance | /admin/attendance/mark | Record or edit attendance by hand |
| Bulk Upload | /admin/attendance/upload | Import attendance from a CSV file |
| Attendance Logs | /admin/attendance/logs | Raw punch records (clock-in/out events) |
| Regularizations | /admin/attendance/regularizations | Approve employee correction requests |
| Overtime Requests | /admin/attendance/overtime | Approve overtime requests |
| Shifts | /admin/attendance/shifts | Working hours, weekly off, attendance mode |
| Attendance Settings | /admin/attendance/settings | Grace, lateness, overtime and reminder rules |
| Biometric Devices | /admin/biometric | Connect and manage ZKTeco devices |
Employees see their own attendance and file correction requests from their portal at
/portal/attendance.
Daily attendance
Open Daily Attendance to see one row per employee for a chosen date. Use the Today / Yesterday chips, the day stepper, or the calendar to move around, and filter by Department. Summary cards at the top count Total, Present, Absent, Late and On Leave.
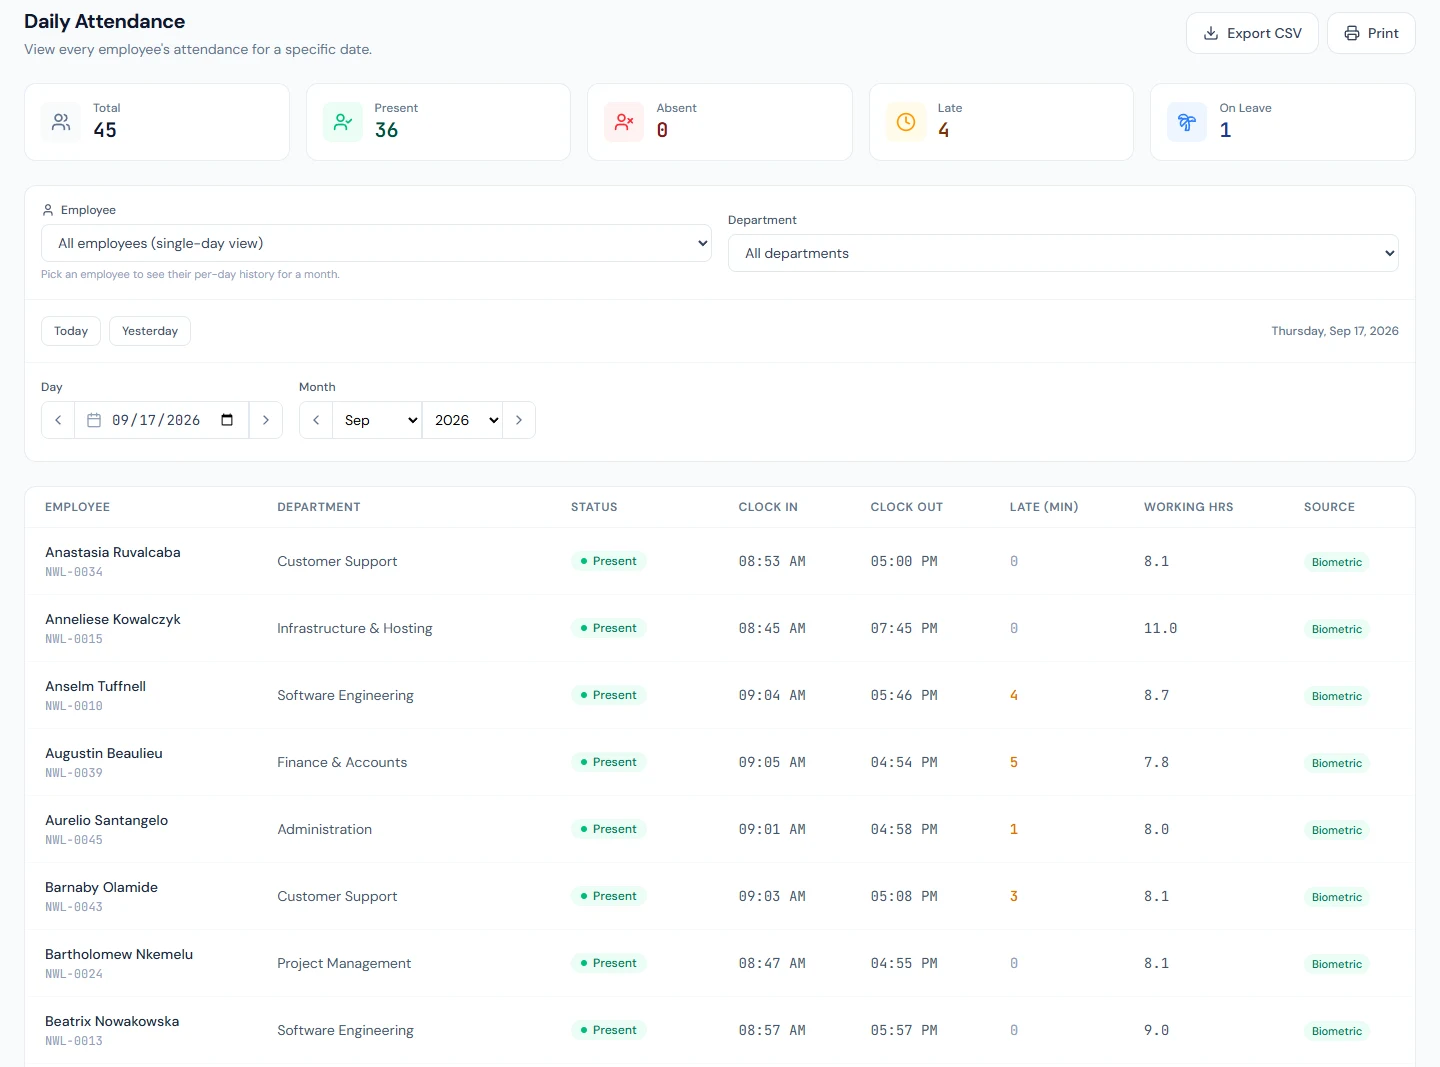
Each row shows the status, clock-in, clock-out, late minutes, working hours and the source of the record (Auto, Biometric, Manual or Import). Days that were worked on a holiday or weekend are highlighted in amber so you can spot overtime-eligible work at a glance.
To see one person's whole month, pick an employee from the Employee dropdown — the page switches to a per-day monthly view with its own summary (present, absent, late, leave days and total hours). Use Export CSV to download the current view or Print for a paper attendance register.
A day where someone punched in but never punched out is tagged Missing Clock-out (once the shift-end plus checkout-grace window has passed). This is only a flag for follow-up — it does not change the day's status or reduce pay. Fix it by filing a regularization.
Marking attendance by hand
Mark Attendance works in two modes:
- Daily mode (default) — every employee for a single date. Set each person's status, clock-in and clock-out, add an optional remark, then Submit Attendance, which writes only the rows you changed (the button shows how many); a row you did not touch keeps its source, so a terminal punch stays Biometric. Mark All Present marks everyone who is not already Present or on leave, with each person's own shift hours where no time is entered.
- Monthly mode — pick an employee to edit their full month. Each day is an editable row; changed rows are highlighted and Save only writes the days you touched. Mark All Working Days Present fills in every working day that is not already Present, on leave, a weekend or a holiday, with the shift's hours for that day.
Available statuses include Present, Absent, Half Day, Late, Early Leave, On Leave, Holiday, Weekend, Work From Home and Comp Off.
The Force (override) lock
In monthly mode each row has a Force checkbox. Normally the clock-in time drives the status — an on-time punch becomes Present, a late one becomes Late/Half-day/Absent, and the system may recompute this in the background. Tick Force to pin the exact status you chose while keeping the real punch times on record. Typical uses:
- Keep an employee Present even though they clocked in two hours late.
- Mark someone Absent for policy reasons even though a punch exists.
If the times themselves are wrong (for example a bogus auto-present time), clear the punch with the small ✕ next to the time field instead of using Force.
Rest-day swaps
In monthly mode, Swap Rest Day records that an employee worked a weekly-off or holiday and takes their rest on a different day instead. The worked day is paid as a normal day and the substitute day shows as the rest day; both are tagged with a Swap marker wherever attendance is displayed.
Shifts
A shift defines working hours and the rules that turn punches into attendance. Open Shifts to add or edit them. Each shift has:
- Start / End time, Break (min) and Grace (min) — the minutes after the start before a punch counts as late; a shift's grace overrides the company-wide one.
- Weekly Off days (tap the day chips).
- Attendance Mode (see below).
- Attendance affects salary — on by default. Turn it off for directors or fixed-retainer staff so absences, half-days and lates never reduce pay (leave balances are still deducted normally). A shift with this off shows a Fixed Pay tag.
- Default Leave Group inherited by employees on the shift.
- Default shift — the shift assigned automatically to every new employee created without an explicit shift (including bulk-imported ones), so nobody ends up with no working pattern. An employee with no shift is never auto-marked present — payroll would read their whole month as absence and deduct nearly the entire salary — so payroll approval is blocked while the workspace has no default shift or while any employee has none (see pre-flight checks). Keep exactly one shift flagged as the default: flagging several makes it undefined which one a new employee inherits, and payroll pre-flight warns about it. New workspaces come seeded with a generic Office Shift (09:00–17:00, auto-present, Sat/Sun off) already flagged as the default.
Attendance modes
The mode decides how a working day is treated when there is no punch.
| Mode | Behaviour |
|---|---|
| Punch Required | Biometric/manual in-out is enforced. A working day with no punch becomes Absent. |
| Auto-Present | For residential or trusted staff. A background job marks working days Present; HR can still override any day by hand. |
| Punch Not Required | Exempt staff. No attendance rows are written on working days, biometric punches are ignored, and the employee is paid in full. |
Punches from a biometric machine or GPS only decide attendance on Punch Required shifts. How attendance is captured lists any auto-present shifts and can switch them to Punch Required after you confirm.
Punch Not Required always behaves as a fixed-pay shift — the Attendance affects salary toggle is locked off for it. Choose a different mode if you need attendance to influence pay.
Exempt days appear as Exempt in attendance views, and monthly summaries count exempt days separately from present/absent totals. Because exempt staff never produce attendance rows by design, the payroll pre-flight check that demands attendance before approval skips employees on Punch Not Required shifts — an exempt shift never blocks payroll.
Regularizations
When an employee's record is wrong (missed punch, working from a client site, etc.) they file a regularization request from their portal Attendance page. Requests land on the Regularizations screen for review.
Each row shows the date, the current status and times, the requested status and times, and the employee's reason (click the eye icon to read a long reason in full). Filter by All, Pending, Approved or Rejected, then Approve or Reject. Approving writes the requested status/times onto the day; these human-approved records are protected and will not be overwritten by later biometric syncs.
You can't approve or reject your own regularization or overtime request while another approver can decide it. In a workspace with only one approver, that person can still decide their own.
Overtime requests
The Overtime Requests screen lists extra-hours requests with the employee, date, hours and reason. Filter and Approve / Reject the same way as regularizations. Employees file them from My Attendance in the portal (Request Overtime: the date, the hours in quarter hours, an optional reason), one open request per day.
Both screens show a reviewer only the requests they can decide. Someone who also has
attendance.view_all (HR and admins) sees every request in the workspace. Someone who can
approve but not view all attendance (the Department Head role, for example) sees,
approves and rejects only the requests of the employees who report to them.
How overtime is credited is controlled in Attendance Settings → Overtime:
- Require OT Approval — when on, overtime hours are credited only for approved requests; unapproved extra hours are recorded but not credited.
- Auto-Approve OT Requests — auto-approves submitted requests while keeping an audit trail.
- Minimum Overtime (minutes) — how long past shift end counts as overtime.
- Overtime Rate Multiplier — printed in the employment agreement. Overtime pay is not calculated automatically yet; pay approved hours through a payroll adjustment.
Bulk upload
To import many records at once, use Bulk Upload. Download the template, fill it in and drop the file back. The CSV columns are:
employeeCode,date,status,clockIn,clockOut
EMP001,2024-01-15,present,09:00,18:00
EMP002,2024-01-15,absent,,
EMP003,2024-01-15,half_day,09:00,13:00
Status values are present, absent, half_day, late or work_from_home. Times are
HH:MM (24-hour) and dates are YYYY-MM-DD. Imported rows show a source of Import.
Attendance logs
Attendance Logs shows the raw punch stream — every clock-in and clock-out event with its time, type, source, device and IP address. Filter with the date presets (Today, This week, This month, and so on), the month stepper, or by employee. This is the audit trail behind the processed attendance you see on the other screens.
Attendance settings
How attendance is captured
The first card on Attendance Settings records how your team clocks in. Tick every method you use — you can combine them:
| Method | Needs | Plan |
|---|---|---|
| Biometric machine | At least one active device (see Biometric devices) | Biometric devices |
| GPS attendance | GPS attendance switched on, a site, and employees assigned to it (see Geo attendance) | GPS attendance |
| HR marks attendance | Nothing | Every plan |
Each chosen method shows Set up and ready or the steps still missing, with a link to each. A method your plan doesn't include is shown locked. This choice drives the Choose how attendance is captured step on the dashboard checklist, which stays open until every chosen method is ready.
If any shift is auto-present, the card points out that punches won't decide attendance on it and offers Require punches, which switches those shifts to Punch Required after you confirm. Days already recorded are not changed; from then on a working day without a punch counts as absent.
Rules
Attendance Settings also holds the company-wide rules:
- Grace Period — minutes after shift start before a late mark.
- Checkout Grace — how long after shift end a punch-out still counts; beyond it the day is flagged as missing a check-out.
- Late Thresholds 1–3 — a day is Late from the first minute past grace. Thresholds 2 and 3 carry a minute value and an action (Mark as Half Day or Mark as Absent) that changes the day's status once the lateness, or the early leaving, passes them. Threshold 1 and the Warning action change nothing automatically; they are printed in the employment agreement's attendance clause.
- Lates per month for Absent — how many lates in a month equal one absent.
- Missing Punch Reminders — email employees who forget to check in or out, after a configurable offset. Holidays, weekly offs, approved leaves and trust-based shifts are skipped.
- Working Days — working days per week and which days are weekly offs.
Biometric devices (ZKTeco)
The Biometric Devices screen connects ZKTeco fingerprint/face terminals so punches flow into attendance automatically.
Adding a device
Click Add Device and the wizard first probes the connection, then collects the details:
- Host and Port (ZKTeco default
4370), Connection type (TCP/UDP) and Comm key if the device uses one. - Timezone and optional Area.
- Auto-sync on/off and its interval in minutes, so punches are pulled on a schedule.
Use Test Connection on any device to confirm it is reachable.
Syncing punches and users
From a device you can:
- Fetch Attendance — pull the latest punches into the workspace. Punches are merged into attendance without overwriting human-approved records (regularizations, leave, holidays).
- Fetch Users — pull the device's user list so you can map each device user to an employee (bind). Unmapped punches stay visible until they are bound.
- Sync Fingerprints — pull enrolled fingerprint templates into the employee library.
- Push Employees — send selected employees down to the device.
Punches pulled from devices appear on the Biometric Punches page (/admin/biometric/punches)
and can be exported to CSV. Per-device Sync History, a Command Log, Device Controls
(enable/disable, restart, power-off, clear data, network/time settings) and Backups
(create and restore device data) are available from each device's pages.
Geo attendance (GPS clock in/out)
Geo attendance is an Enterprise feature. On other plans the menu entries appear locked.
Employees can clock in and out from the employee portal when they are physically at a company site. The check runs on the server: the browser only reports the phone's or laptop's coordinates, and the workspace decides whether they are close enough.
Turn it on under Attendance Settings → Geo Attendance. Two settings live there:
- Enable Geo Attendance — the master switch, off until you turn it on.
- Max GPS Accuracy (meters) — punches whose reported accuracy is worse than this are refused. The default of 100 m keeps out coarse wifi- or IP-based location guesses that could otherwise place someone inside a site they are nowhere near.
Setting up locations
Geo Locations (/admin/attendance/geo-locations) is where you define the sites:
- Name, Latitude and Longitude. Stand at the site and press Use my current location to fill the coordinates from your own device, or paste them from a map. View on map opens the point in Google Maps so you can sanity-check it.
- Radius (m) — how far from that point still counts, from 10 m up to 10 km. A small office might use 100 m; a factory compound, warehouse yard or event venue needs more. The radius is per location, so each site can differ.
- Branch — optional link to a company branch, for reporting.
- Status — set a location to Inactive to pause it without deleting its history.
Assigning employees
Defining a site does not by itself let anyone punch from it. Open Assignments on a location and select the employees who may use it. Only assigned employees can clock in there, and only at the locations they are assigned to. Saving replaces the whole list, so unticking someone removes their access.
Reviewing attempts
Geo Punch Attempts (/admin/attendance/geo-attempts) records every attempt, the
successful ones and the refused ones, with the employee, time, the nearest site, how far
away they were, the accuracy their device reported, and the coordinates. When an employee
says "it won't let me clock in", the reason is on this page. Refusals are one of:
| Reason | What happened |
|---|---|
| Geo attendance disabled | The company switch is off. |
| Not assigned to any site | Nobody has assigned them to a location yet. |
| GPS accuracy too low | Their device's fix was vaguer than the configured maximum. |
| Outside site radius | They were too far away; the message tells them the site and distance. |
| Punch-exempt shift | Their shift is Punch Not Required on that date. |
| Day finalized by HR | The day was regularized or force-set, so a punch cannot change it. |
| Checkout window closed | Too long after shift end — they should file a regularization. |
| Already recorded | The day already had a record the punch could not change. |
Accepted geo punches become ordinary attendance: the same late grading, overtime and shift rules as a biometric punch, recorded with a source of "geo". Days that HR has already regularized or force-set are never overwritten.
What employees see
On My Attendance in the portal, assigned employees get a Clock In / Clock Out button. Their browser asks permission to use their location the first time. The button knows which action is next, so they cannot clock in twice. If they are out of range the message names the site and how far away they are.
Who can do what
Attendance and biometric actions are gated by permissions:
attendance.view_all— view all attendance, logs, settings and geo punch attempts.attendance.mark— mark and edit attendance (and rest-day swaps).attendance.bulk_mark— bulk mark / CSV upload.attendance.regularize_approve— review and approve regularizations (only their direct reports' withoutattendance.view_all).attendance.overtime_approve— review and approve overtime (only their direct reports' withoutattendance.view_all).attendance.geo_manage— create geo locations and assign employees to them.company.settings— change attendance settings, including how attendance is captured.attendance.manage— create and edit shifts, including Require punches on the capture card.biometric.viewandbiometric.manage— view or manage devices.
Employees need no extra permission to clock in — being assigned to a location is what grants it.
Employees use attendance.view_own and attendance.regularize_request to see their own
records and file correction requests from the portal.