Employees
The Employees area is where you keep the record for everyone who works in your workspace. From here you add new hires, open a person's profile, review their documents, and record transfers and promotions.
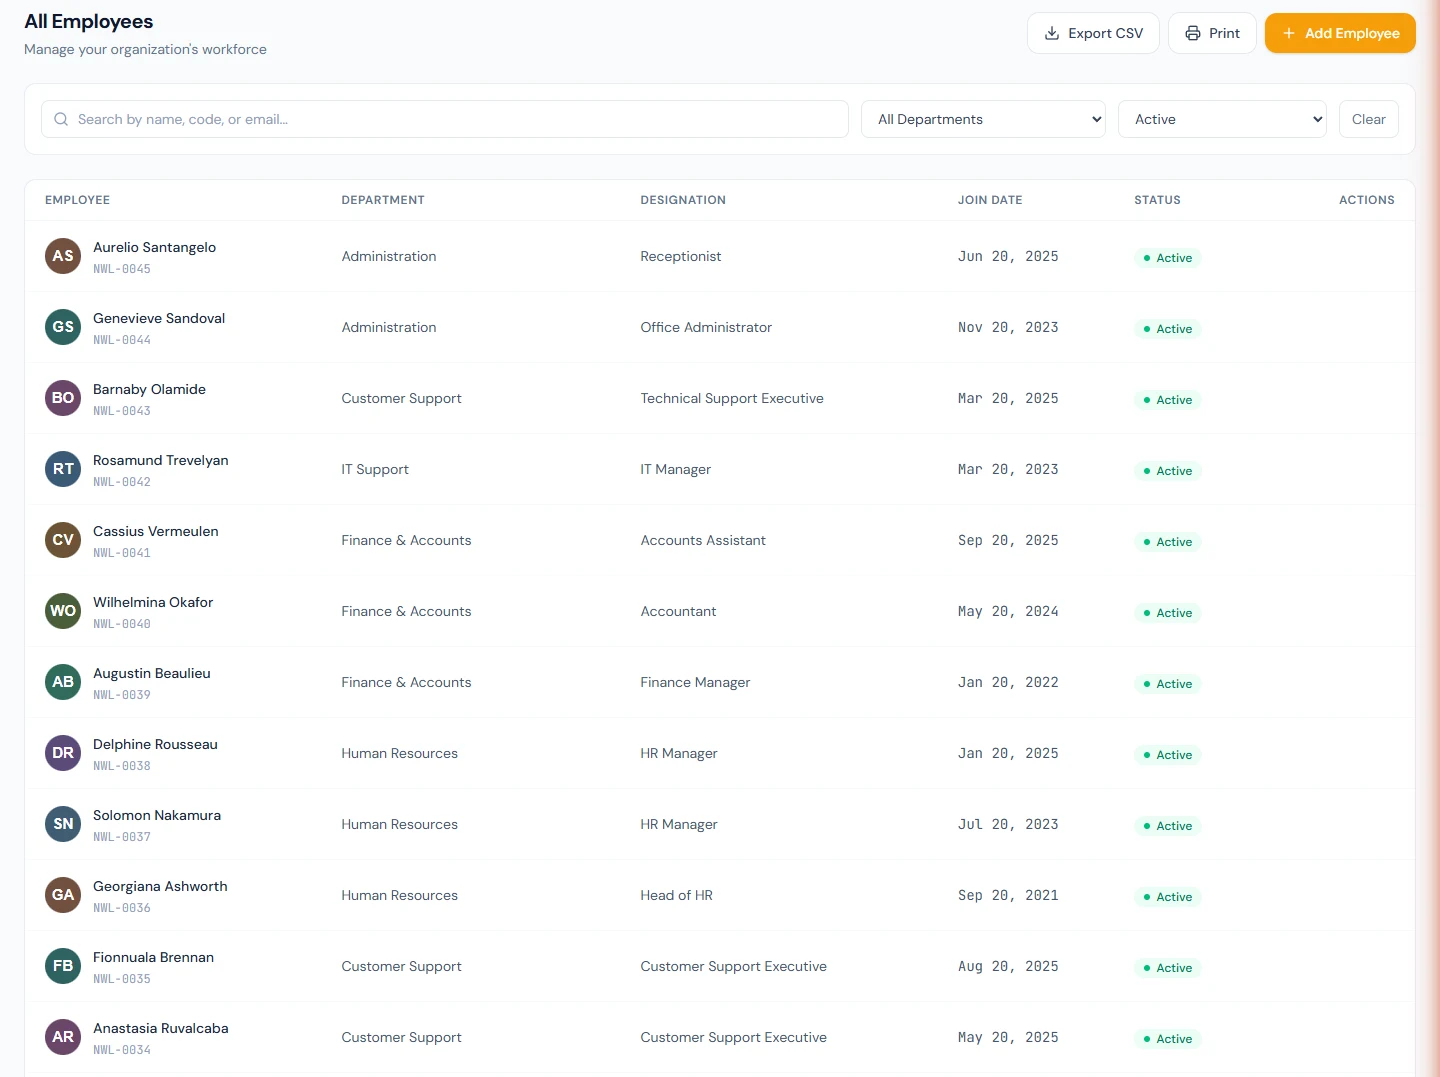
Open Employees from the admin sidebar to reach the directory at
/admin/employees. Search by name (first, last, or both together), employee
code, identity number, or email, and filter by department and status. The list
shows the newest records first, 25 to a page. Export CSV and Print take
every employee the current filter matches, not only the page on screen.
Adding an employee
- On the All Employees page, click Add Employee (top right). This opens
the form at
/admin/employees/create. - Choose the Portal access mode (see below), then fill in the details across the sections.
- Click Create Employee.
The employee code (for example EMP-0001) is generated for you automatically,
following the format set in your company settings.
Portal access: invite, or admin-managed
The Portal Access card at the top of the form decides how the person's account is set up:
| Choice | What it means |
|---|---|
| Invite to portal (default, recommended) | An activation invitation is emailed. The employee signs in, completes their own personal details in My Account, and submits them for your approval (see Profile approvals). |
| No portal login | Admin-managed — no credentials are created and the person never signs in. HR enters everything, and the record's details count as approved from the start. You can invite them later at any time. |
A no-portal employee still counts as a billable seat on your plan — they
are billed like any other active employee — and an
admin with the impersonation permission can still open the portal as them
(audited) when something needs checking from the employee's side. On the Users
page (/admin/access/users) the membership shows a No portal badge with an
Invite to portal action — enter an email address and the standard
invitation flow upgrades the account whenever you're ready. See
Users, roles & permissions.
Required fields
You cannot save the employee until these are filled in:
| Field | Section |
|---|---|
| First Name | Personal Information |
| Last Name | Personal Information |
| Department | Employment Details |
| Designation | Employment Details |
| Employment Type | Employment Details |
| Joining Date | Employment Details |
| Present Address — Address Line 1, City, Country | Present Address (No portal login records only) |
For an admin-managed ("No portal login") employee, a complete present address — Address Line 1, City, and Country — is mandatory; the form and the server both reject the record without it. For an invited employee the address is optional at creation: the person provides it themselves through their profile submission, and HR approves it with the rest of their details.
Optional details you can add now
- Personal Information — the identity number your country uses (a Social Security Number in the US, an Emirates ID in the UAE), Date of Birth, Gender, Marital Status, plus Father's Name and a tax number (NTN) where your country uses them. An identity number, if entered, must be unique within your workspace.
- Contact Information — Personal Email, Official Email, Primary Phone (with country code). Official Email is the company-owned work mailbox — all in-employment system emails go there. Personal Email is the person's own address — HR's channel after employment ends, and (under the default sign-in policy) the preferred address for the account invitation.
- Employment Details — Probation End Date (optional; it lists the person on the Probations page, which reminds you before the date and records the confirmation), Reporting Manager, Daily Reports preference (follow the designation default, or force Required / Exempt), Loans & Advances eligibility, Shift, and Leave Group. Leaving Shift or Leave Group blank falls back to the company/shift default.
- Emergency Contact / SOS — contact name, phone, and relationship.
- Bank Account — pick a bank from the list, then account title, account number, and IBAN. A bank must be selected for the account to be saved.
Hiring through the Recruitment module? Use Convert to Employee on the candidate. It opens this same form with the candidate's name, email, phone, department, designation, and joining date already filled in — you just add the official email, identity number, address, and bank details.
The account invitation
When Portal access is Invite to portal, creating an employee does not set a password for them. Instead, an invitation email with a single-use activation link (valid for 7 days) is sent, and the person activates their own account:
- Which address is invited is decided by your workspace's sign-in policy under Settings → Workspace → Member accounts. Under the default Flexible policy the invitation goes to the Personal Email, falling back to the Official Email; under Official email only it always goes to the Official Email. If both email fields are left empty, an extra Invitation Email field appears on the form so you can enter an address to invite.
- The invited address becomes the sign-in email. The activation page is bound to exactly that address. A brand-new address chooses a password and is signed straight into the portal. An address that already has an Operentra account (for example from a sister company) enters its existing password instead — your workspace is simply added to that account, and the person can switch between companies from the top bar.
- Until the invitation is accepted, the person shows an Invited badge on the
Users page (
/admin/access/users), with a re-send action if the link expires.
The invitation email is a regular template (trigger employee_invitation,
category Employee Lifecycle), so you can customize its wording under your email
templates.
An invited employee's record starts with its personal details incomplete by design — the person fills them in and submits them for your review from their own account. See Profile approvals below for how those submissions reach you.
An employee created with no email at all gets no invitation. You can still create their login manually from the Users page (with an admin-set password). Adding an email to the profile later does not send an invitation automatically — manual user creation is the path in that case.
Plans, seats and billing
Paid plans bill per employee per month: your bill is your active headcount, floored at your plan's seat minimum. Adding people raises the next invoice instead of hitting a cap — there is no employee ceiling on standard plans.
Creating an employee is still blocked (with a prompt to visit Billing) when your trial has ended or your subscription is canceled — and, only if your provider set an explicit headcount cap on a bespoke deal, when you reach that cap. In that last case the message names the plan and the cap, for example "The Growth plan includes up to 50 employees. Upgrade your plan to add more."
Your Billing page (/admin/billing) shows how many seats you are currently
billed for — including when the plan's seat minimum is doing the work — and
what adding one more employee costs. Deleted employees do not count; only
active records do.
Employee statuses & activation
Every employee record carries a status, shown as a colored badge throughout the directory and profile:
| Status | Badge | Meaning |
|---|---|---|
| New | New (Pending Activation) (amber) | Every record is created in this state — see below. |
| Active | Active (green) | Fully part of operations: payroll, attendance, leave. |
| On Leave | On Leave | Away for an extended period. While set, the person is left out of payroll runs, attendance and leave allocation. Ordinary approved leave is recorded in Leave and keeps the status Active. |
| Suspended | Suspended | Barred from duty for now. Left out of payroll runs, attendance and leave allocation while set; the login stays open. |
| Terminated | Terminated | Employment ended by the company. Only on older records: the Status menu no longer offers it (see below). |
| Resigned | Resigned | Employment ended by the employee. Only on older records, as Terminated. |
| Retired | Retired | Employment ended at retirement. Only on older records, as Terminated. |
| Separated | Separated (slate) | Written only by the offboarding module when a final settlement completes. It is final: you can never pick it by hand, and the Status menu offers nothing else once it is set. See Onboarding & offboarding. To employ the person again, use Rehire (see Rehiring a former employee). |
Changing a status by hand
The Status menu on the profile offers only these changes:
| Current status | The menu offers |
|---|---|
| New (Pending Activation) | Active (this is activation, see below) |
| Active | On Leave, Suspended |
| On Leave | Active, Suspended |
| Suspended | Active, On Leave |
| Terminated, Resigned or Retired | Active |
| Separated | Nothing (Rehire starts a new employment instead) |
Someone who is leaving is never given a status by hand. Pick Start
offboarding at the bottom of the Status menu instead (it needs the
offboarding.manage permission). It opens Offboarding with the person
already chosen, where you record the separation: its type, notice date,
separation date, last working day and reason. Offboarding runs the clearance
checklist and the final settlement, and writes Separated when the settlement
completes; the status is left alone until then. See
Onboarding & offboarding.
Terminated, Resigned and Retired were once offered on the Status menu, where they recorded only the status and the date, with no separation record or settlement. A record that still carries one can be set back to Active (which also clears that date) or offboarded the same way as anyone else.
The API applies the same rules: PATCH /api/employees/:id/status refuses any
other change with a 400 that names both statuses, and the employee edit form
never changes the status.
What "New (Pending Activation)" means
A pending employee is excluded from payroll runs (no salary, no slip), attendance, leave accrual, and headcount reports — but still counts as a billable seat on your plan. You are paying for someone the system is not yet processing, which is exactly why you should not leave people pending.
How an employee becomes active
Activation follows a fixed three-step sequence. Each step can be done while the employee is still pending:
- Assign a salary structure — Payroll → Employee Salaries
(
/admin/payroll/salaries). Pending employees can be assigned a salary; only departed ones (Separated, Terminated, Resigned, Retired) are refused. - Create the employment contract — requires the assigned salary, and the contract form pre-fills from it. See Contracts & HR letters.
- The contract is accepted — either the employee e-accepts it in their
portal (My Contract,
/portal/contract), or HR uses Upload signed copy on the contract. The moment either happens, the employee flips to Active automatically and their pro-rata leave balance for the current fiscal year is allocated.
You can also activate by hand: pick Active from the Status menu on the profile, the only status it offers a pending employee. This routes through the exact same activation logic, so it allocates pro-rata leave too.
To activate several people at once, filter the Employees directory by New
(Pending Activation), tick the people you want and click Activate selected,
or click Activate all for everyone the current filters show. Each person goes
through the same activation as a single one, pro-rata leave included, and the
result tells you how many were activated, how many were skipped because they were
no longer pending, and how many could not be activated. It needs the same
permission as changing a status on the profile (employees.update). Use it when
contracts are handled outside the system, or to include imported staff in a test
payroll.
If your workspace has no current active fiscal year, a manually or automatically activated employee still becomes Active — but their leave balances stay empty until a fiscal year is opened and allocation is re-run.
Where you'll see the pending state
- The employee profile shows an amber "This employee is not active yet" panel with the three-step checklist: done steps are ticked, the current blocking step is highlighted, and each open step carries a button that deep-links to the right screen.
- The Employees directory shows an amber banner — "N employees are pending activation" — with a Show them button whenever any exist and your filter isn't already on them, plus a New (Pending Activation) option in the status filter. With that filter on, a blue bar offers Activate selected and Activate all.
- The edit page shows the status badge next to the title and an amber strip with a See what's needed link back to the profile.
The payroll pre-flight also reports pending-activation employees as a single warning naming them ("will not be paid — still pending activation") instead of raising missing-shift, missing-salary, or missing-attendance blockers for people the run would never pay.
The employee profile
Click any name in the directory to open their profile at
/admin/employees/{id}. The profile gathers everything about the person into
cards:
- Personal Information, Contact Information, and Emergency Contact / SOS
- Employment Details — code, department, designation, employment type, branch, joining date, and reporting manager, plus a Status row (the badge, with an explanatory help icon while the employee is pending activation) and Probation End and Confirmation Date rows. For a rehired employee, a Previously employed row under the joining date shows each earlier employment, for example Jun 2023 – Feb 2026.
- Shift — the current shift, with Assign Shift / Change Shift and View History
- Leave Configuration — the resolved leave group and each policy's remaining balance, showing whether the group comes from an employee override, the shift, or the company default
- Address, Biometric, and Bank Account
From the profile header you can:
- Change status — the button reads Status:
<current status>. The menu shows the current status and the changes it allows (for an Active employee, On Leave and Suspended), plus Start offboarding for anyone not yet Separated, and Rehire for someone who is. Picking Active for a pending employee performs full activation (including leave allocation), not just a label change. See Changing a status by hand and Rehiring a former employee. - Edit the record (opens
/admin/employees/{id}/edit). - Delete the employee (asks for confirmation; there is no undo on screen). The record disappears from every list, the person's login is closed and their signed-in devices are ended; what they did while employed stays on file. Delete is for records created by mistake. Someone who has worked and been paid leaves through a separation instead.
The Photo card at the top of the edit screen takes a JPG, PNG or GIF; the photo then appears beside the name throughout the directory and profile.
Rehiring a former employee
Someone whose offboarding is settled (status Separated) can be employed
again on the same record. Open their profile, open the Status menu and pick
Rehire. It needs employees.create, the permission that adds an employee. A
second record for the same person is not the way: the identity number must be
unique in the workspace, so it is refused.
The Rehire dialog asks for:
| Field | Notes |
|---|---|
| Joining Date | Required. The first day of the new employment; it must be after the last day of the earlier one (its separation date, or its last working day if that is later). |
| Department, Designation, Employment Type | Required. Filled in from the record. |
| Branch, Reporting Manager, Leave Group | Filled in from the record. A reporting manager must be someone still employed. |
| Shift | Filled in with the shift on file. Left on the company default, it works as on Add Employee. It starts on the new joining date. |
| Probation End Date | Optional, as on Add Employee. |
| Portal access | Invite to portal or No portal login, as on Add Employee. When the record has no email address, an invitation address can be typed in. |
What a rehire does:
- A new employment, not an undo. The employee becomes New (Pending Activation) from the new joining date, with the same employee code. The separation date, confirmation date and old probation end date are cleared. The normal activation steps then apply: assign a salary, create the contract, and the accepted contract (or Active on the Status menu) activates them and opens their leave balance. The activation checklist counts only a contract made after the rehire.
- The earlier employment is kept. Its separation and final settlement, payslips, contracts, letters, attendance and leave applications stay as they are. The profile shows it as Previously employed. The Attrition report still measures that separation from the earlier joining date, and the Monthly Summary and Absenteeism reports still list the person for months of the earlier employment.
- What the earlier employment left open ends on its last day: its salary assignment, so the checklist asks for a new salary and payroll can never pay the old one, and its shift.
- Leave starts fresh. The leave balances of the fiscal year the person rejoins in are cleared (a copy is kept with the rehire), and nothing carries forward from a fiscal year that ended before the new joining date. Activation then allocates the pro-rata balance from the new joining date, as for any new employee.
- Onboarding starts again. The earlier onboarding checklist is replaced by a new one, as for a new employee. The tasks that complete themselves count only what is done for this hire: a new contract, newly issued assets, a new probation review.
- Portal access. With Invite to portal, an invitation goes to the address your sign-in policy picks, by the same rules as Add Employee. If their sign-in to your workspace is still open (rehired within the account grace period), they keep it. A closed sign-in is never simply switched back on: the person accepts the new invitation as a new hire does (an address that already has an active Operentra login joins with its existing password), and the reopened membership's roles go back to Employee. With No portal login, the membership is admin-managed, with no sign-in.
- On record. The Activity Log shows the rehire as Rehired, with the
earlier and the new employment, and integrations receive
employee.updated.
Service counts from the new joining date. Payroll prorates the first month from it as for any new joiner, the leave minimum-service rules and pro-rata allocation count from it, and a later final settlement measures years of service for gratuity from it. The earlier employment's gratuity and leave encashment were paid in its own settlement.
The Status menu still never offers New, and PATCH /api/employees/:id/status
refuses Separated → New: a rehire is only this action.
Profile approvals (employee-submitted details)
Employees own their personal details. Each person edits their profile — personal fields, addresses, and primary bank account — in their own My Account area, and nothing reaches your employee records until they submit it to your company and you approve it. What you approve becomes your company's verified copy, and from then on only HR edits it — the employee proposes further changes through the same submission flow.
Every employee record carries a profile status:
| Status | Meaning |
|---|---|
draft | Invited to the portal; you are waiting for their first approved submission |
submitted | The person's first submission is sitting in your review queue. A later change from an already-approved record waits without changing the status |
approved | The record holds company-approved data (HR-entered records, and all records that existed before this feature, start here) |
The review queue
Open Profile Approvals (/admin/employees/profile-approvals, permission
employees.update) to see every pending submission. The admin Dashboard
also raises an alert — "N profile submission(s) awaiting review" — that links
straight here.
Each row expands to a field-level diff: only what would actually change on your record is shown, current value against proposed value, including addresses (per type) and the bank account. For each submission you can:
- Approve — the snapshot is copied into your employee record. If the phone number, emergency contact, or an address changed, its verification resets to unverified so your normal verification flows re-run. A submitted bank name that matches your workspace's bank list is linked to the catalog entry automatically, so bank payment files keep working. An address submitted without a country is recorded under your workspace's country.
- Return — send it back with an optional note. Your record keeps its current data; the employee is told what to fix and can submit again.
Approve refuses a snapshot it cannot apply and says why: a blank first or last name, an identity number that does not fit your country's rule, or one already on another employee's record. The submission stays in the queue; return it with a note that names the problem.
A submission holds a snapshot of the person's profile at the moment they sent it — approving applies exactly what you reviewed, even if the person kept editing afterwards.
Two seeded email templates (category Employee Lifecycle) keep both sides
informed: profile_submission_pending notifies users holding
employees.update with a link to the queue, and
profile_submission_reviewed tells the employee the outcome — approved, or
returned along with your note.
Documents & expiry
Open Documents (/admin/employees/documents) and choose an employee to see
all of their document types laid out as cards. A summary strip across the top
counts Document Types, Uploaded, Verified, Pending, Rejected, and Missing
Mandatory (highlighted in red when anything required is still missing).
Each document type shows tags where relevant:
- Required — a mandatory document for every employee.
- Multi — the type allows more than one entry (older uploads move under View history).
For each uploaded document you can:
- Preview files (images and PDFs open in a viewer; anything else downloads).
- Verify a pending document, or Reject it with a reason (the employee is emailed and must re-upload).
- Revoke a verification you granted earlier, with a reason.
- Delete an uploaded or rejected document.
Uploads are checked against the type. Each document type lists its allowed formats and a maximum size per file (Settings → Verification shows both); a file outside them is refused with a message naming the file and the rule.
Dates on a document: some types ask for issue and expiry dates as part of the upload — the identity document in countries where the card itself expires, medical and police certificates, and the UAE residence visa and labour card — and the dates are shown on the document's card. Nothing alerts on an approaching date yet; the admin Dashboard alert "N documents awaiting verification" counts uploads still waiting for review and links to the Document Review queue.
Document Review queue
Document Review (/admin/employees/document-review) is a focused inbox of
everything employees have submitted through the portal that is still pending.
Reviewers see the employee, document type, file thumbnails, and upload date, and
can Verify or Reject (with a reason) in one place instead of opening each
profile. This page needs the document-verify permission.
Document Compliance
Document Compliance (/admin/employees/document-compliance) shows who still
owes what across the whole workspace. Each employee is a row and each document
type a column, and every cell shows one state: Verified, Uploaded (when
document verification is switched off), Pending, Rejected, or
Missing. A missing required document is outlined in red.
- Summary tiles count the employees with every required document, the employees still missing one, the documents awaiting review, and the rejected documents waiting for a re-upload — always for the rows currently shown.
- The Required docs column shows how many required types are complete (verified or uploaded) and the percentage, rounded down so an incomplete file never reads 100%. When no document type is marked required, completion is not measured.
- Filters: search by name or employee code; switch between current employees (the default), former employees, or everyone; narrow by department, branch, employment type, or a single document type; and show only incomplete, missing, pending, or rejected entries. Sort by completion to see who is furthest behind.
- Click a name or any cell to open that employee on the Documents page, where you can verify, reject, or delete.
- Export CSV downloads exactly the rows and document columns on screen, with a status per document type and a list of each employee's missing required documents.
How a cell's state is decided: for most types only the latest upload counts, so a re-upload replaces an earlier rejection. Types that accept several documents (such as educational records) count every upload — any rejected upload shows Rejected, otherwise any pending one shows Pending. A cell holding more than one upload shows a count; hover over it for the breakdown. This is the same rule employees see on their own portal Documents page.
This page needs the view-all-documents permission.
Transfers
Transfers (/admin/employees/transfers) records movements between
departments, designations, or branches.
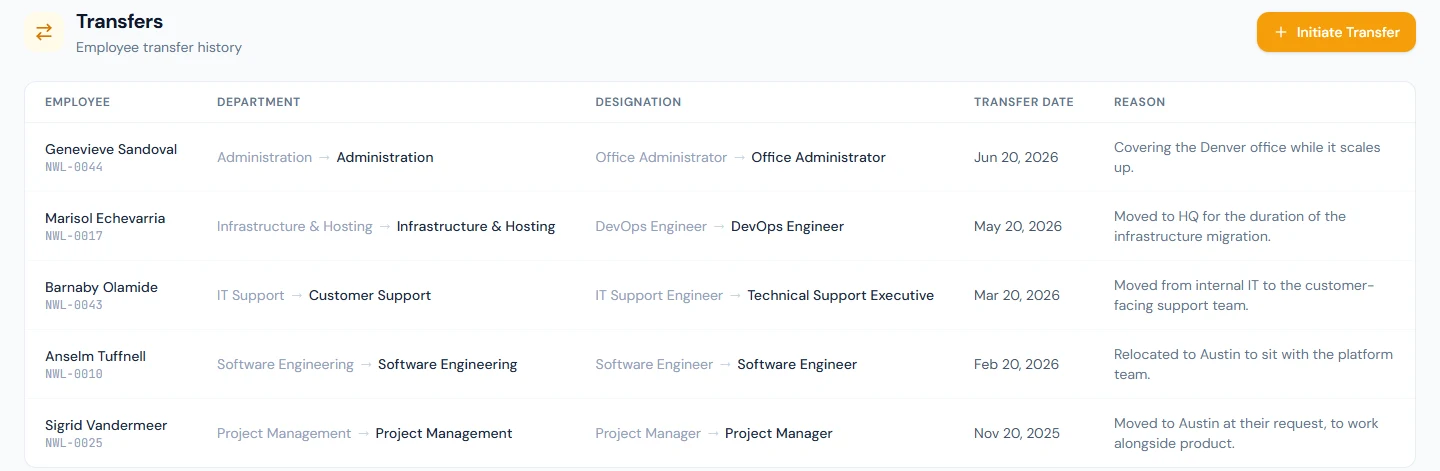
- Click Initiate Transfer.
- Choose the Employee and a Transfer Date (both required).
- Set any of New Department, New Designation, or New Branch — leave any of them on No change to keep the current value.
- Optionally add a Reason, then click Transfer.
The page keeps a dated history of every transfer, showing the from → to change
of department, designation and branch for each employee. Recording a transfer
updates the employee record, emails the employee a transfer notice with the
same from → to pairs, and issues a transfer letter from the active
transfer_letter template. The reporting manager and shift are not changed —
adjust them on the employee record if the move needs it.
Promotions
Promotions (/admin/employees/promotions) records a change in designation,
optionally with a new salary.
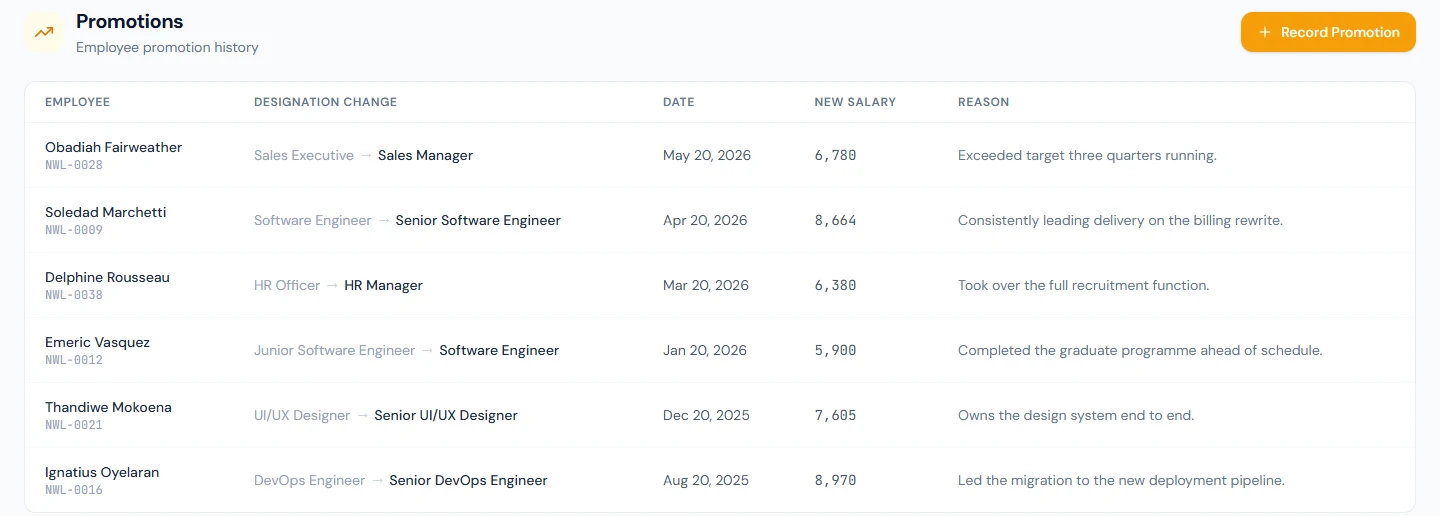
- Click Record Promotion.
- Choose the Employee, the New Designation, and a Promotion Date (all required).
- Optionally enter a New Salary and a Reason, then click Promote.
Each row shows the old → new designation, the date, and the new salary where one
was set. Recording a promotion updates the designation on the employee record,
emails a promotion notice and issues a promotion letter from the active
promotion_letter template; the letter prints the new salary only when one was
entered. The new salary is a record, not a pay change — payroll keeps the
current salary assignment until you apply a salary increment (Payroll →
Increments).
Bulk import
Bulk Import (/admin/employees/import) lets you create many employees, or
assign salaries to many employees, from a CSV file. It has two tabs:
- Import Employees — creates employees in bulk. Each imported employee with an email address is sent an account invitation, just as when you add one by hand — see The account invitation.
- Assign Salaries — sets gross salary for existing employees by code, closing
the previous assignment automatically.
grossSalaryis the monthly gross as a plain number (a thousands separator such as6,500is read as 6500); the structure is the employee's current one, or for a first salary the workspace's oldest active structure. Employees who have left are refused. It records no increment, sends no email and issues no letter — it is for first salaries and migrations, not for raises.
Steps:
- Click Download Sample CSV and fill in your data using it as the template.
Columns marked with
*are required. - Click to select your
.csvfile (UTF-8, comma-separated). The page parses it and previews the first rows. - Click Import and confirm. The page sends the file in batches of 50 rows and shows its progress. A results panel then shows how many rows were Created / Assigned, Skipped, and Errors, with a per-row message; a created row names the employee code it was given. Rows are independent: an error in one never undoes the others, and if a batch fails part-way the rows already processed are listed so you can remove them before importing the rest.
For the employee import, the required columns are firstName, lastName,
departmentCode, designationCode, and joiningDate; other columns such as
nationalId, emails, phone, and emergency contact are optional. nationalId
takes the identity number your country uses (a Social Security Number in the
US, for example); files made from an older template that head it cnic still
import. A fatherName column is included only where your country records it.
employmentType must match the name of one of your employment types as
listed under Company Setup (Permanent, Contract, Intern, …; case does not
matter); a blank cell means Permanent, and a name that matches nothing fails
the row rather than defaulting silently. Dates (joiningDate,
dateOfBirth) are written YYYY-MM-DD; a value a spreadsheet has rewritten
as 15/01/2024 fails the row. Bulk-imported
employees start as New (Pending Activation) like everyone else — see
Employee statuses & activation.
The template also carries six optional address columns: addressLine1,
addressLine2, city, stateProvince, country, and postalCode. A filled
set creates the employee's present address — the minimum is addressLine1 plus
city, and a blank country falls back to your workspace country. A
partially filled address fails that row with "Incomplete address:
addressLine1 and city are required when any address column is filled" rather
than importing bad data. A fully blank address still creates the employee, and
the results panel flags the row: "Employee created — no present address on
file; complete it from the employee profile". Wrap any value containing commas
(typical for address line 1) in double quotes — the parser handles quoted
fields, and the sample CSV shows the pattern (e.g. "House 12, Street 5").
Employees imported without an address are never locked out of the portal by the address-verification deadline — that 30-day clock only starts counting when a verification is actually requested.
On standard plans imported rows are not capped — every created employee becomes a billable seat on your next invoice. An operator-set headcount cap on a bespoke deal still applies (rows beyond it are not created), and import is blocked entirely while your trial is expired or your subscription is canceled.
Address & identity verifications
Verifications (/admin/employees/verifications) is where you clear pending
identity checks. It has three tabs — Address, Mobile, and SOS
Contact — each showing a count of what is still pending.
Which checks are enforced
The checks themselves are switched on and off in Settings → Verification
(/admin/settings/verification, permission company.settings). There are
three toggles:
- Address Verification — on by default. The employee verifies their home address with a secret code sent by postal letter. The 30-day portal deadline starts when a letter is requested (by the employee, or by HR from the Verifications page) — an address nobody has started is never blocked; each code allows 3 attempts and expires after 45 days. While an address is pending, the employee gets a reminder email on the 7th, 14th, 21st and 28th day after the request, shortly after 09:00 in your workspace's time zone.
- Document Verification — on by default. Employees must upload their mandatory documents (identity card, photo, certificates), which HR reviews and verifies.
- Phone Verification — off by default (opt-in). SMS OTP for the employee's mobile number and their SOS/emergency contact.
Phone verification is opt-in by design because it needs an SMS provider to be
usable at all. Even when you switch it on, it never blocks anyone until your
workspace has an active SMS provider configured
(/admin/integrations/sms) — without one the OTP cannot be sent, so the gate
stays inactive rather than locking employees out of the portal behind a check
they cannot satisfy.
The pending-verifications checklist employees see in their portal only lists checks that are actually enabled for your workspace, and its progress count matches what is shown — a disabled check never appears as outstanding work.
The Address tab
The Address tab lists every address of a current employee that is not yet verified: letters already requested first (oldest request at the top), then the addresses nobody has started. Each row shows the employee, the address, its status, the date the letter was requested and how many attempts have been made. For each row you can:
- Generate code and letter (unverified rows) — starts the verification from HR's side: a code is issued, the 30-day clock starts, and the employee is emailed that a letter is on its way. Then download and post the letter.
- Download letter (pending rows) — the PDF containing the verification code to post to the employee's address.
- Regenerate code (pending rows) — a fresh code and a new letter, for example when the first never arrived or the three attempts are used up. The old code stops working and the 30-day clock restarts.
- Mark verified or Mark unverified — an override that sets the status
directly without a letter. It needs
company.settings(Super Admin and HR Manager); marking unverified also cancels the deadline.
Employees enter the code from their letter in their self-service portal to verify their own address (Dashboard banner or My Profile → Verifications). Once a requested letter is 30 days old without a correct code, the employee's portal shows only the verification page until it is cleared — so keep this queue moving.
The Mobile and SOS Contact tabs need mobile_verification.manage. They
show a notice when phone verification is switched off or no active SMS provider
exists: in either case a code cannot reach the employee, so Send OTP now is
disabled until that is fixed.